Header Install
Tools Necessary:
- reliable socket set
- metric wrenches
- jack and jack stands or ramps
- penetrating oil
- hammer
- MAP gas torch (maybe)
- crescent wrench
- torque wrench
The install will be easier on newer cars in that the bolts
shouldn't be too badly rusted. It can still be done on older cars.
You may want to consider buying new bolts for the connection between
the header and catalytic converter. On every Honda that I have done,
the gasket between the head and exhaust manifold is metal. You can
reuse this or pick up a new one for about $20. You may also need to
buy a donut gasket for the civic/integra header.
This procedure is the same for Civics/Integras and Preludes. I'll
note any differences.
Obviously, raise and secure the vehicle. It may be easier if you
can raise the whole vehicle but it isn't necessary.
For starters, soak every bolt with the penetrating oil. Use an
oil that is not flammable, that way if you need to break out the
torch you won't have any problems. By the way, WD-40 is flammable.
Let the oil soak for a while. Start by removing the bolts that
attach the exhaust manifold to the cat. This is the hardest part of
the install and the only part where a torch may be necessary. If you
have access to an impact tool I would strongly suggest using it. It
takes a strong arm to get the bolts off. Use a torch if all else
fails. After that, remove the mounting bracket bolts that are behind
and in front of the engine. Most headers will have mounts welded
that attach to the rear bracket but none have mounts for the front
bracket. For the Prelude, you will need to separate the two sections
of the original exhaust manifold. It won't be possible to pull the
whole thing out. There is one exhaust hanger on the Prelude header
that needs to be removed. Oil will help get this off. Separating the
two sections will not be necessary on the Civic. Make sure to
disconnect the O2 sensor. Try not to damage the sensor for the
reason that a new one is over $100. Remove the heat shield that
covers the exhaust manifold. Usually three small bolts. There are
approximately 9 nuts that hold the exhaust manifold to the head.
Carefully remove them and set them aside. On the Civic, pull the
exhaust manifold away from the head. It is cast iron and very heavy
so be careful. You should be able to slide it right down. On the
Prelude, you should already have removed the lower section of the
stock manifold. Pull the top portion away from the head and pull it
out. Remove the brackets for the front exhaust manifold mount.
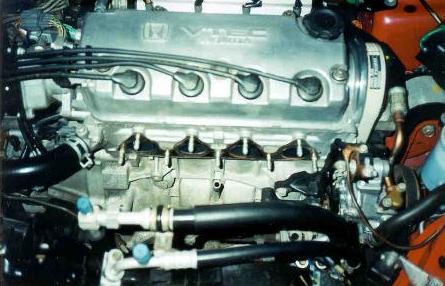
 Engine with Exhaust manifold Removed.
Use the crescent wrench to remove the O2 sensor. You may need to
spray a bit of oil to remove it. Make sure NOT to get any on the
sensor itself. Install the O2 sensor on the new header.
Replace the exhaust manifold gasket, if necessary.
(Civic) Most headers for the civic have relocated O2 sensor
holes. In that case, an extension wire will be included. You will
need to carefully route the extension wire for the Civic's O2 sensor
behind the engine. Make sure it doesn't come in contact with any
moving parts or exhaust tubing. Use cable ties to secure the wire.
It is possible to assemble the two sections of the header and slip
it in from underneath. Slip the header onto the studs on the head.
Make sure everything lines up properly. Install the nuts that hold
the header to the head. Install the nuts that hold the header to the
rear mounting bracket and install the bolts that hold the header to
the cat. Make sure to reconnect the O2 sensor. Use a torque wrench
to properly tighten the bolts to the head and the two sections of
the header. It's about 25 ft-lbs for the head, and 50 ft-lbs for the
two sections. Start the vehicle and check for leaks...trust me, if
it has a leak, you will know.
(Prelude) Install the top section of the header. Make sure you
have removed the front exhaust manifold mounting bracket. The new
header will not fit if you don't remove it. Reinstall the header
nuts, and torque to about 25 ft-lbs. From underneath the car,
install the lower section of the header. Make sure the crush gaskets
don't fall out. They are not reusable. Install the bolts that hold
the bottom section of the header to the top section. Install the
rear mounting bracket bolts and install the bolts that hold the
header to the cat. Make sure the connect the O2 sensor. Don't forget
to slip the rubber hanger back on. Start the car and check for
leaks.
That wasn't so bad...was it?
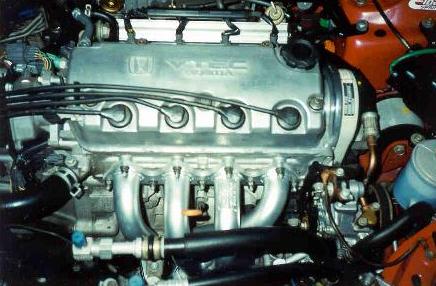
 Finished Product
Exhaust Install
Tools Necessary:
- reliable socket set
- metric wrenches
- jack and jack stands or ramps
- penetrating oil
- hammer
- MAP gas torch (maybe)
Removing the old exhaust
As with the header, this install will be much easier on newer
cars. If you can't get a hold of 4 jack stands, raising the rear end
of the vehicle should be enough. However, it will be much easier to
do with the whole vehicle raised. Once the vehicle is secured, soak
all of the bolts that will be removed with penetrating oil. For most
Hondas, there will be three bolts on the catalytic converter and two
bolts holding the front and rear sections together. After you let
the oil soak for a while unbolt the rear section of the exhaust. It
will make the front section easier to remove. Undo the rubber
hangers and pull the rear section out of the vehicle. Undo the rest
of the exhaust hangers. This will allow the front section to drop.
This will give you more clearance to remove the cat bolts. You may
need a torch to remove the cat bolts. Remove the bolts and slide the
rest of the exhaust out. One side note, it will also be much easier
to separate the cat from the exhaust manifold/header. This will
allow better access to the bolts that hold the cat and front
together.
Installing new exhaust
Install the new front section. Start by replacing the cat bolts
and tightening them. Next, hang the b-pipe using the existing
hangers. Carefully slide the new rear section over the suspension
components and hang it up using the existing hangers. Join the front
and rear sections using the supplied bolts. Make sure to use the
gaskets that are supplied as well. Start the vehicle and check for
leaks. Lower the vehicle and have fun.
Note: The procedure above is for a complete cat-back
exhaust. Some kits may be rear section replacements. In that case,
don't worry about replacing the front and follow the directions for
replacing the rear section.
|