The Build
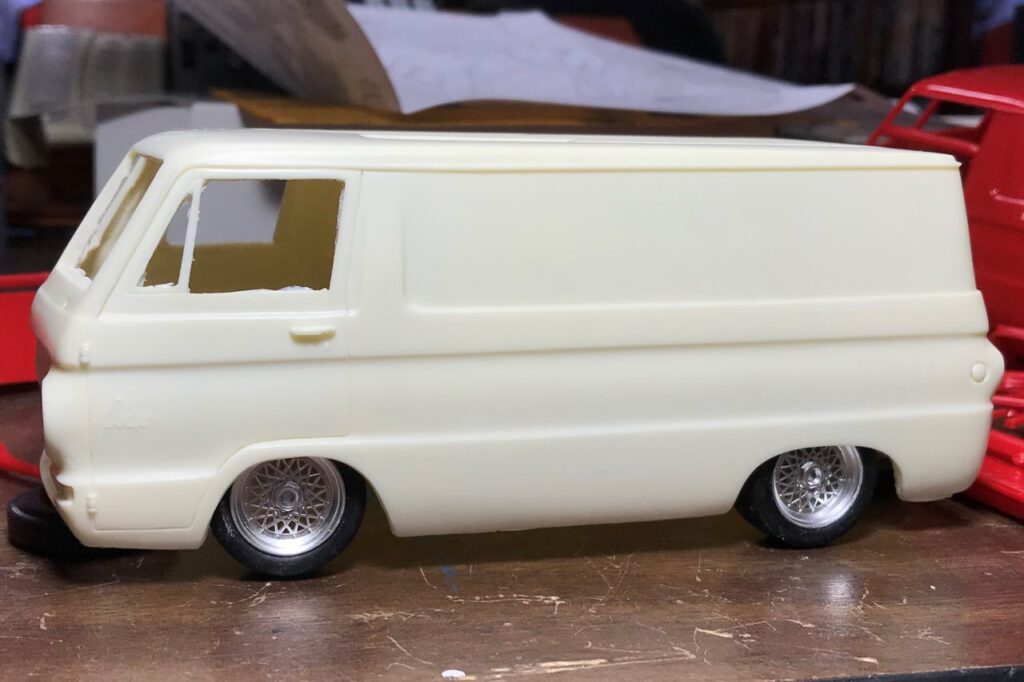
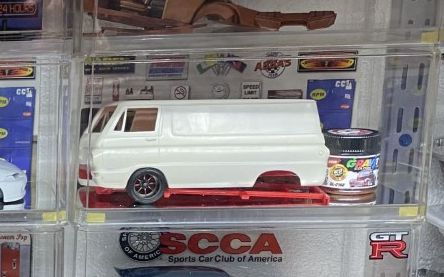
These old vans are awesome! The Little Red Wagon is also great, but it’s not the van. This will be my first resin kit build and I’m a bit intimidated. I bought both the Little Red Wagon and van body at the same swap meet. The body is a Jimmy Flintstone confirmed by the man himself. Preparing the body to accept the chassis is going to be quite a project. Once I get past that, the rest of the build will be straight forward. Ha!
Early Concepts
Since lowered vans are my thing, I’m going to lower it significantly. For wheels, I’m considering using a set of BBS wheels from a E30 M3 racecar kit. So far, I like the mock-up.
But later:
The intent was always to use the Little Red Wagon kit to finish this build. The chassis didn’t fit in the body correctly because of the way it was cast. Then there was no way to slam the suspension but to absolutely butchering every piece. That detail is why this project failed to get moving.
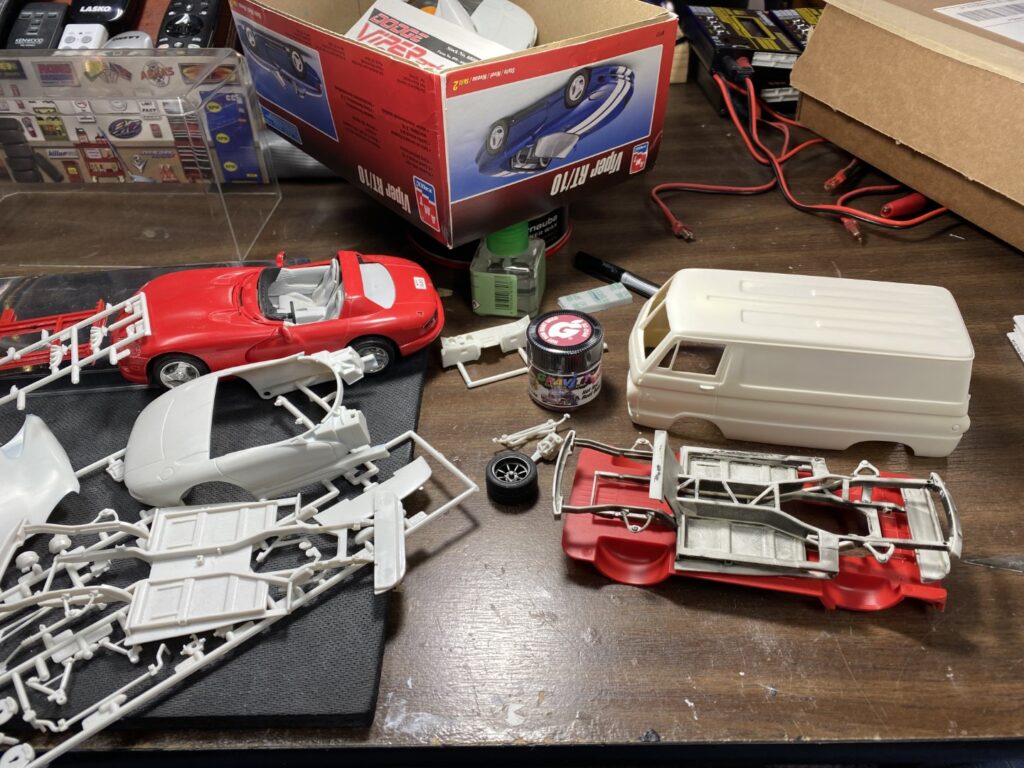
After many years, and acquiring a few junk Viper kits, I wanted to use the V10. As the wheels turned, why not use the whole viper! the Viper Van concept was born! I’ll get into the details of the conversion below.
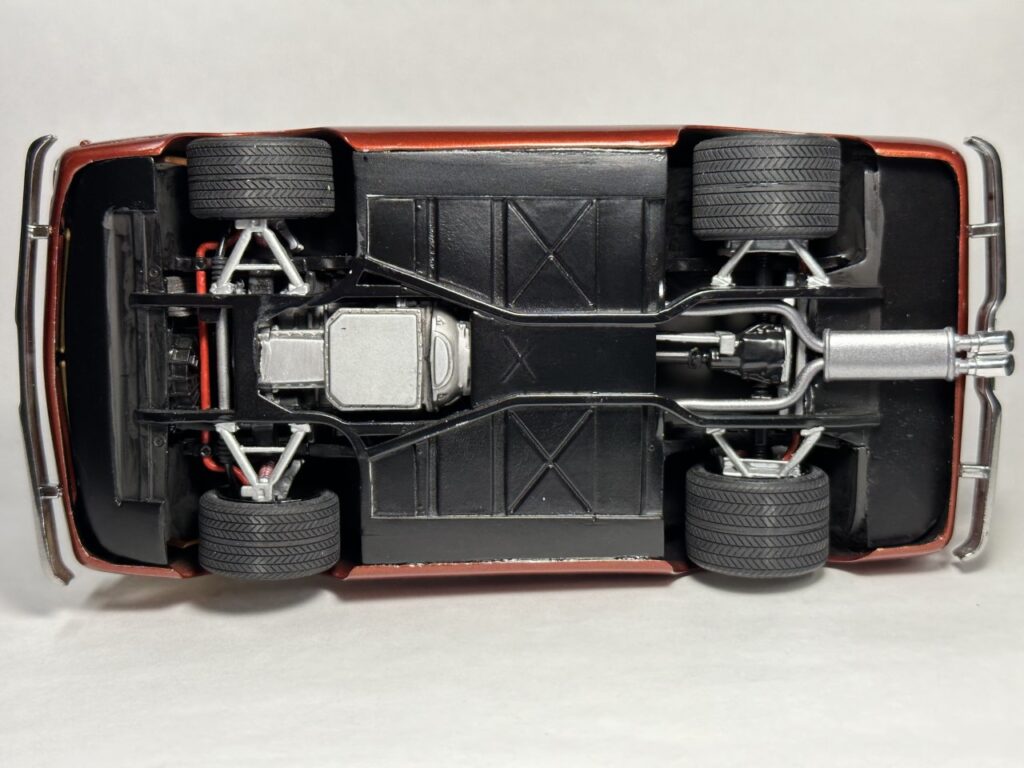
Chassis/Suspension
I normally start my posts with body work. Since the chassis makes this model what it is, I’m going to lead with it for my story. After deciding that the Viper Van needed to happen, I dug through my stash of junk viper kits and got a feel for what I could do. Clearly, the wheelbase was too long.
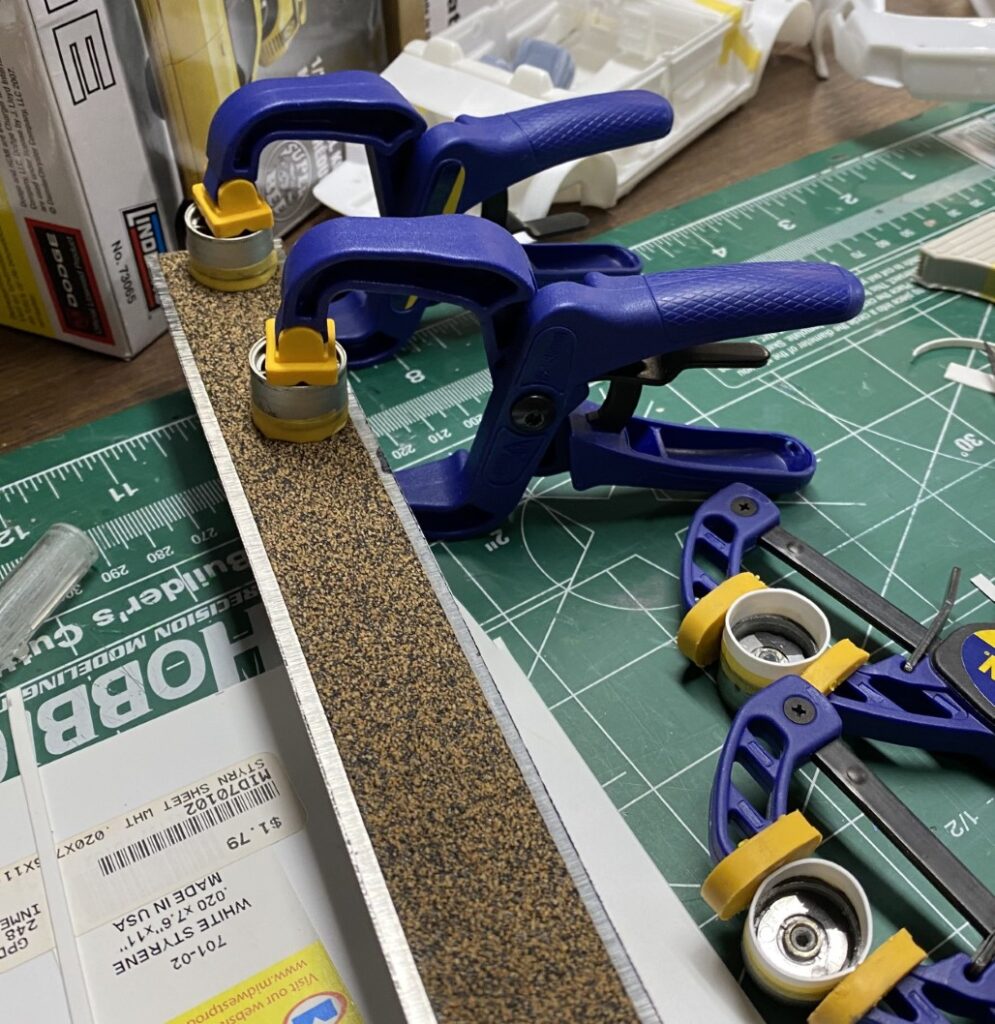
To figure out the wheel base, I marked the wheel center and then partially assembled the chassis. Setting it in place, I could see how much I had to shorten it. It took 2 chops for a total of about 1/2″. The next two pictures are before the second chop.

While lining up parts for the first cut, I incorrectly eyeballed the wheel centers. After more careful measuring, I made the second cut and it was time to figure out how to make it all work.
I used binder clips to keep the chassis flat and a clamp to put pressure on the joint.
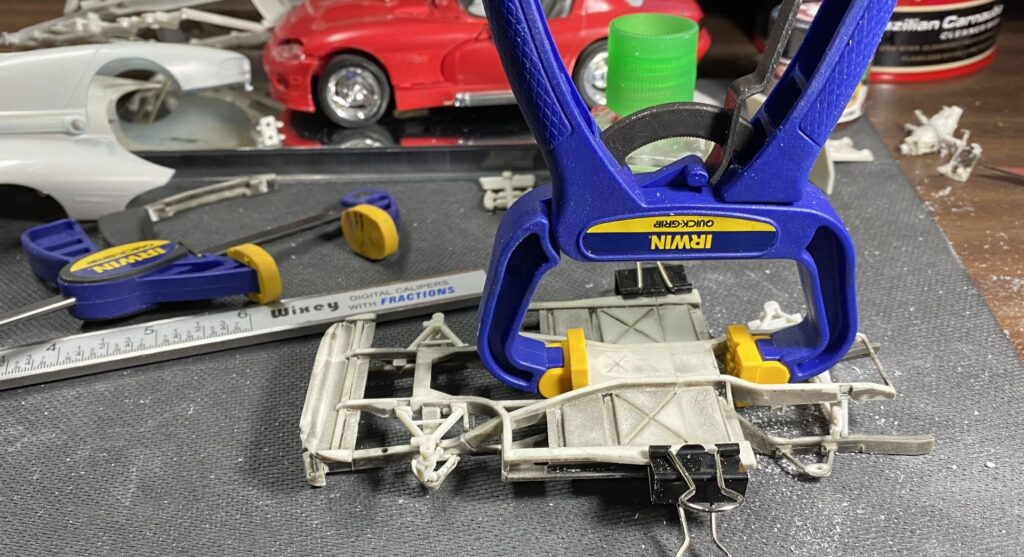
Although this isn’t the best picture, you can see the difference between the cut and uncut chassis. One day, I’ll build the viper and there will be a photoshoot.
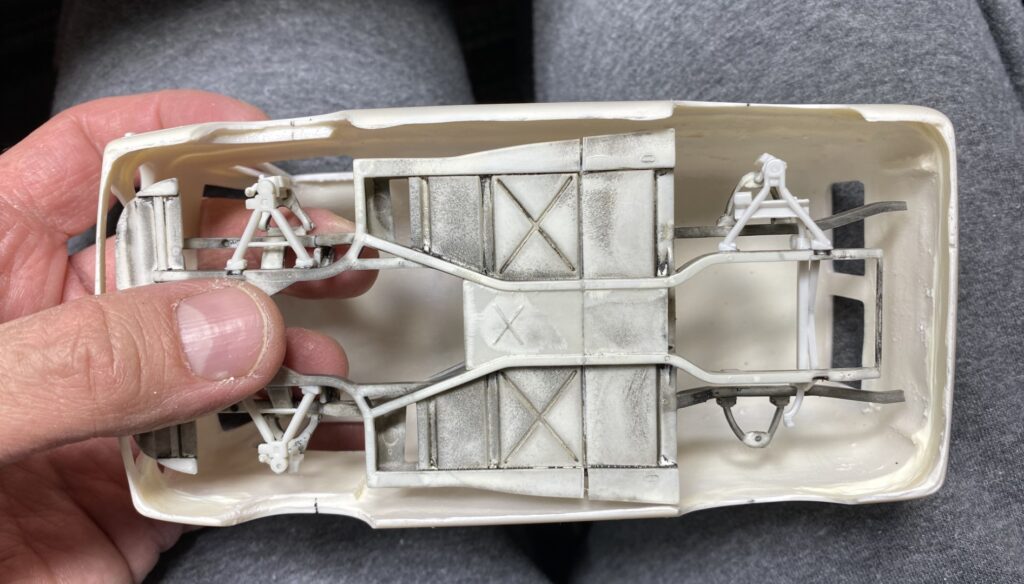
The van was shorter than the Viper but definitely wider. There were several gaps that needed to be filled and that was accomplished with sheet styrene.
The front of the chassis sat below the body of the van. To correct that issue, I made a relief cut in the chassis, aligned the piece to the body, then glued it in place. One thing to note: even though I had a plan to use these parts to build the van, the overall build took many turns as ideas and plans changed.
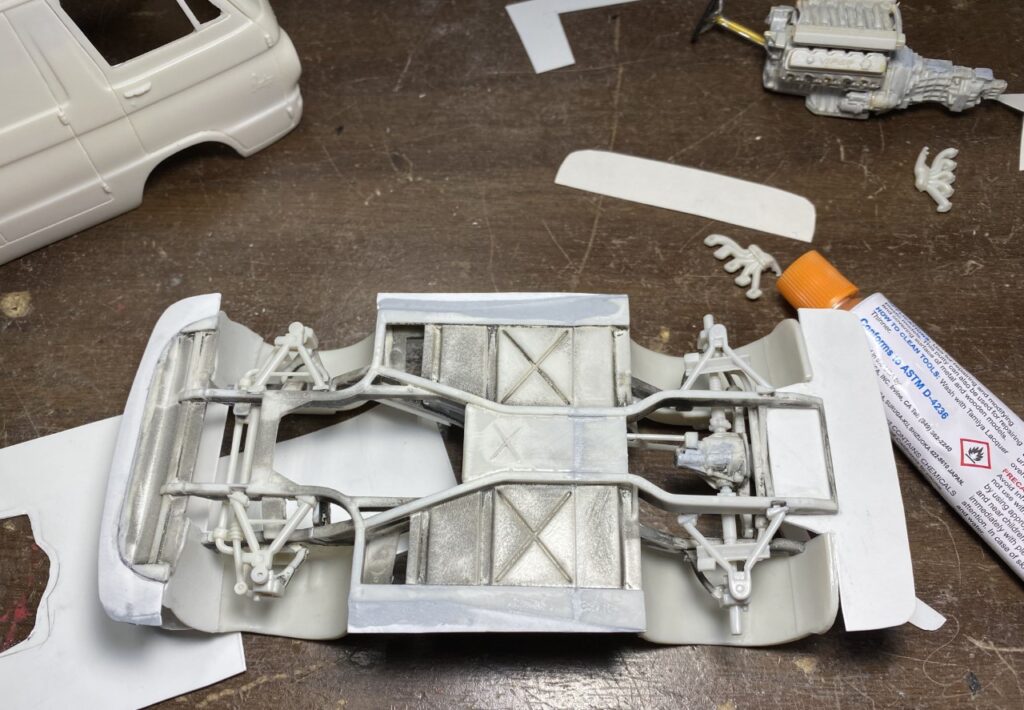
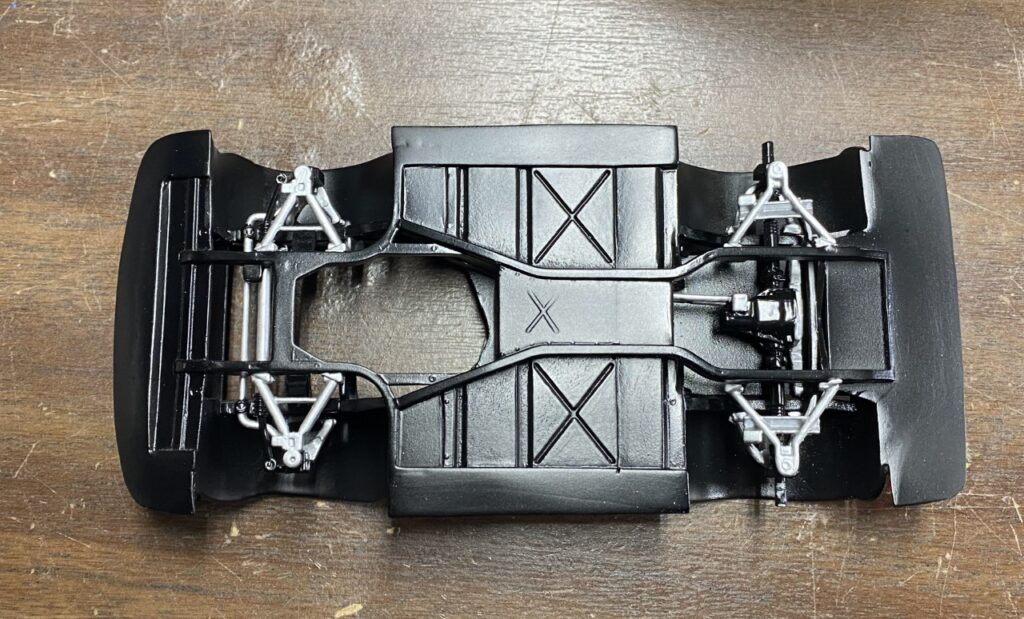
Sort of finally committed to finishing the chassis, I primed and painted the parts. I say this because there were changes that required paint down the road.
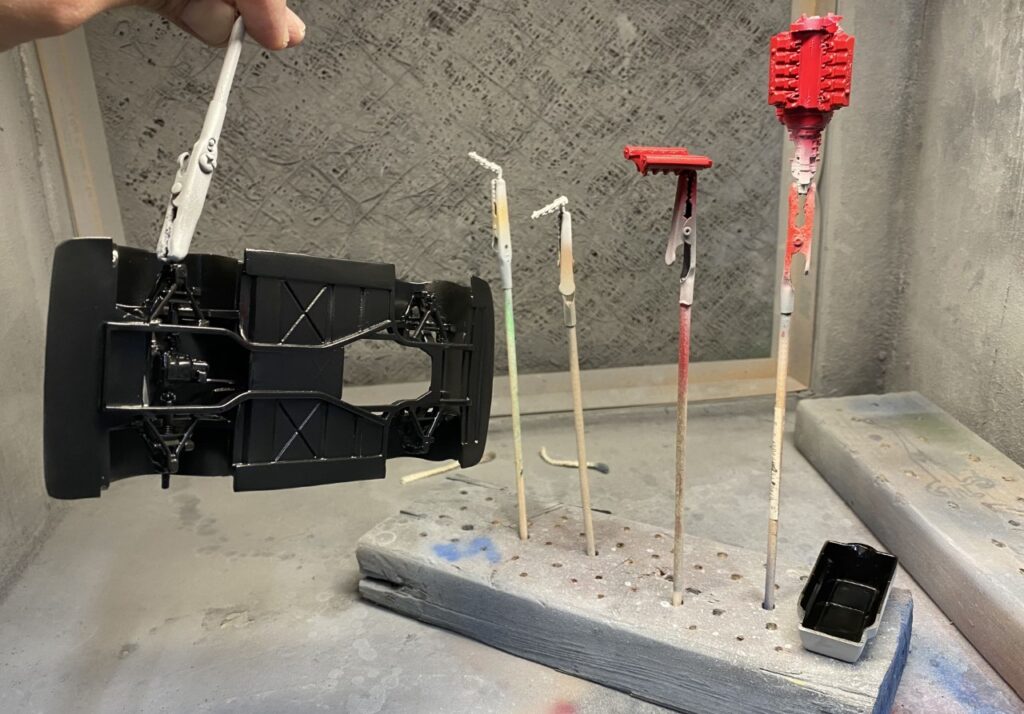
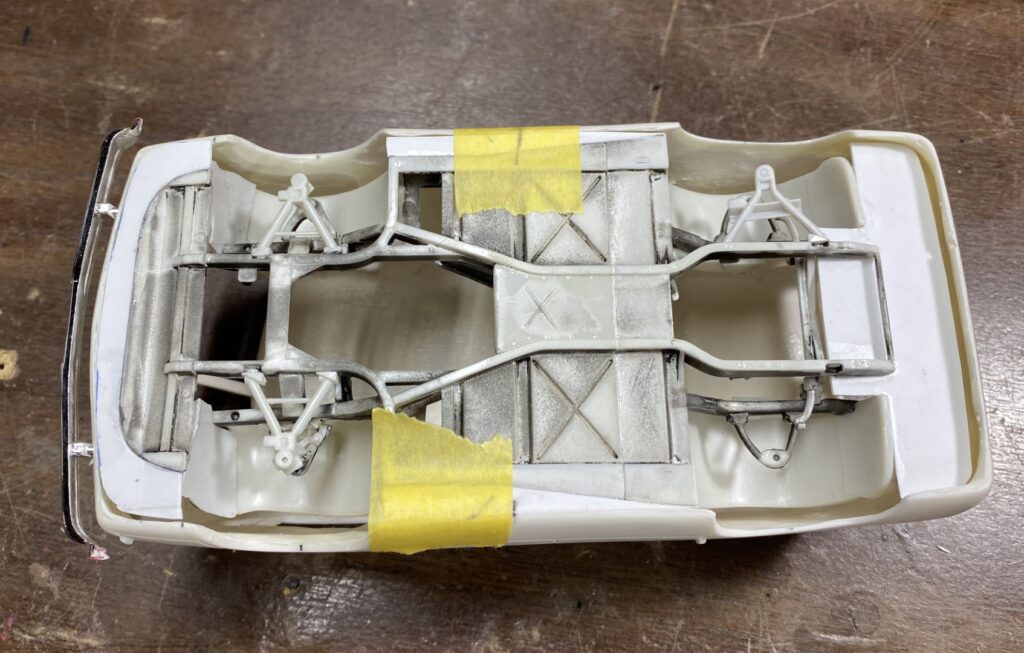
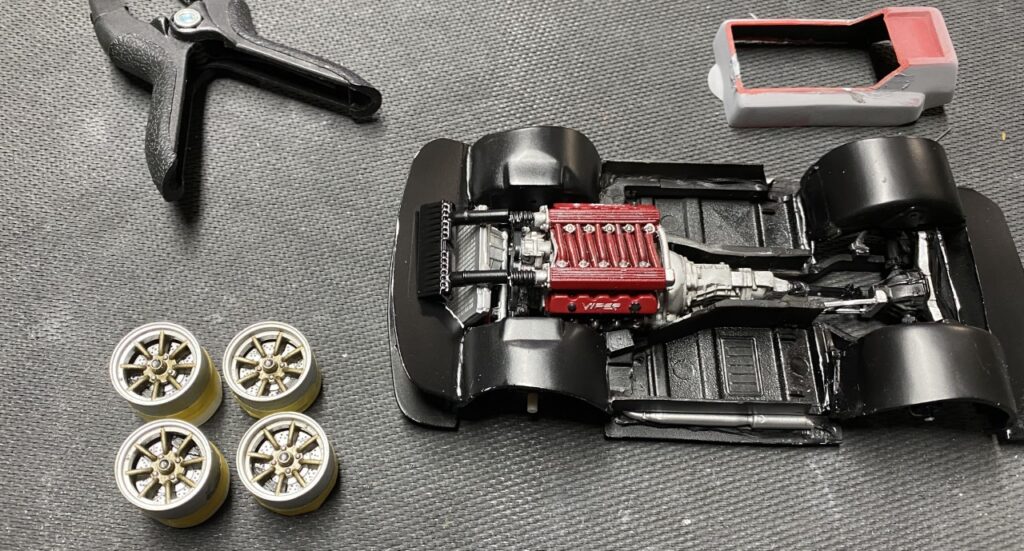
The chassis was mostly ready for final assembly by this point, I had completed most of the detail painting and moved on to other parts.
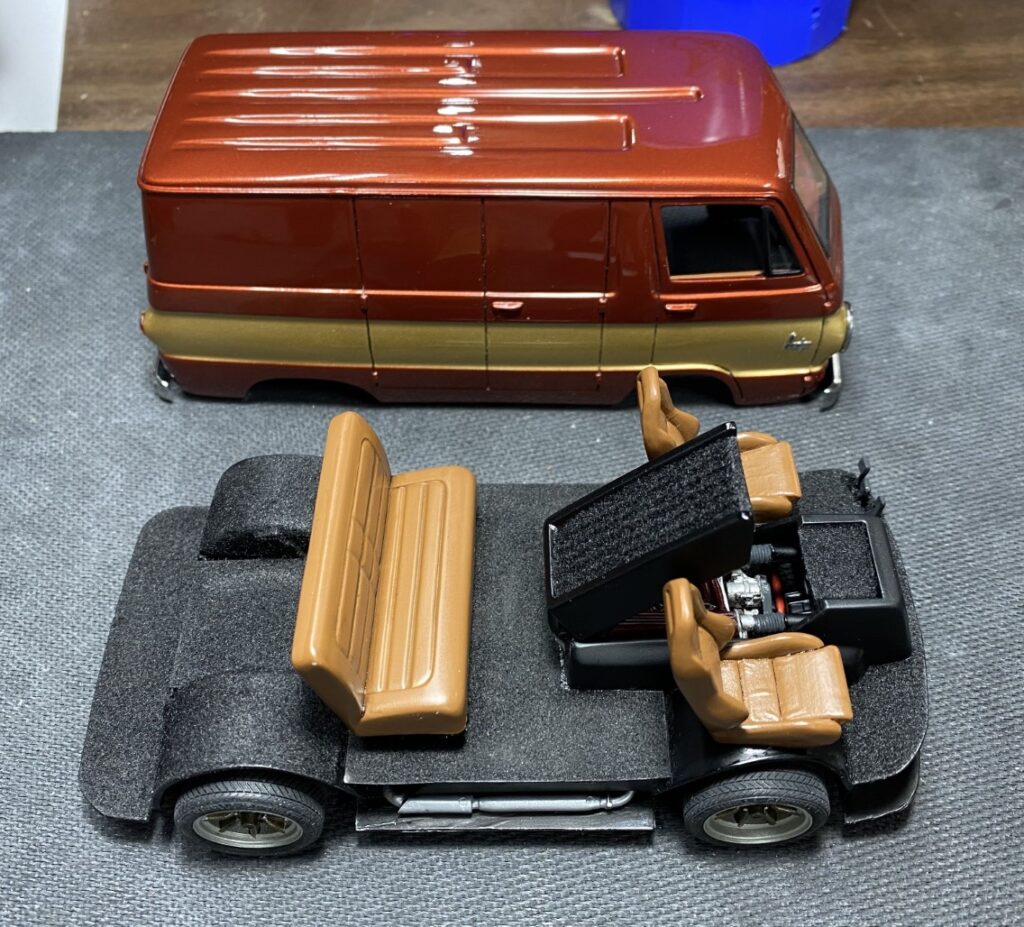
Interior
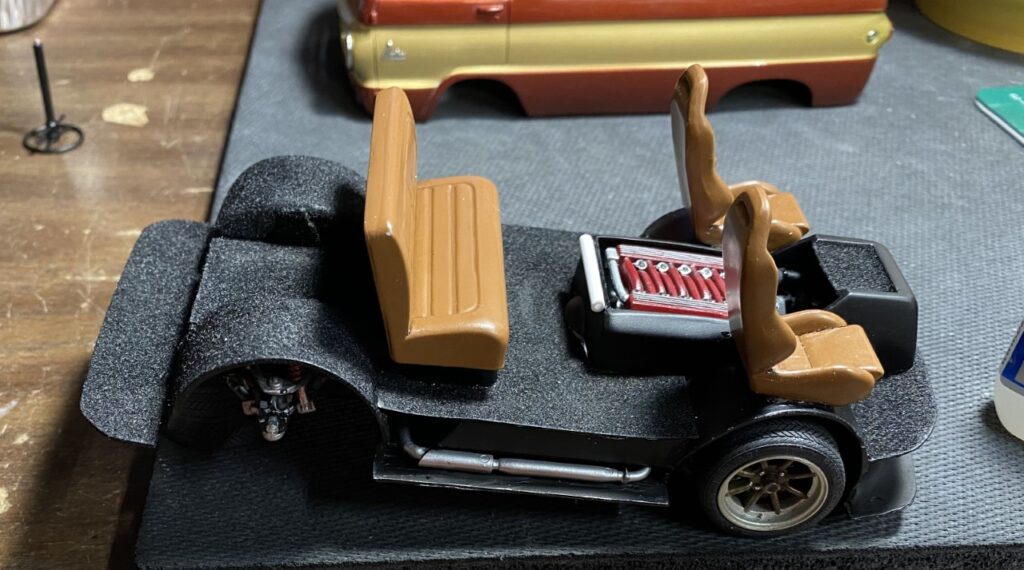
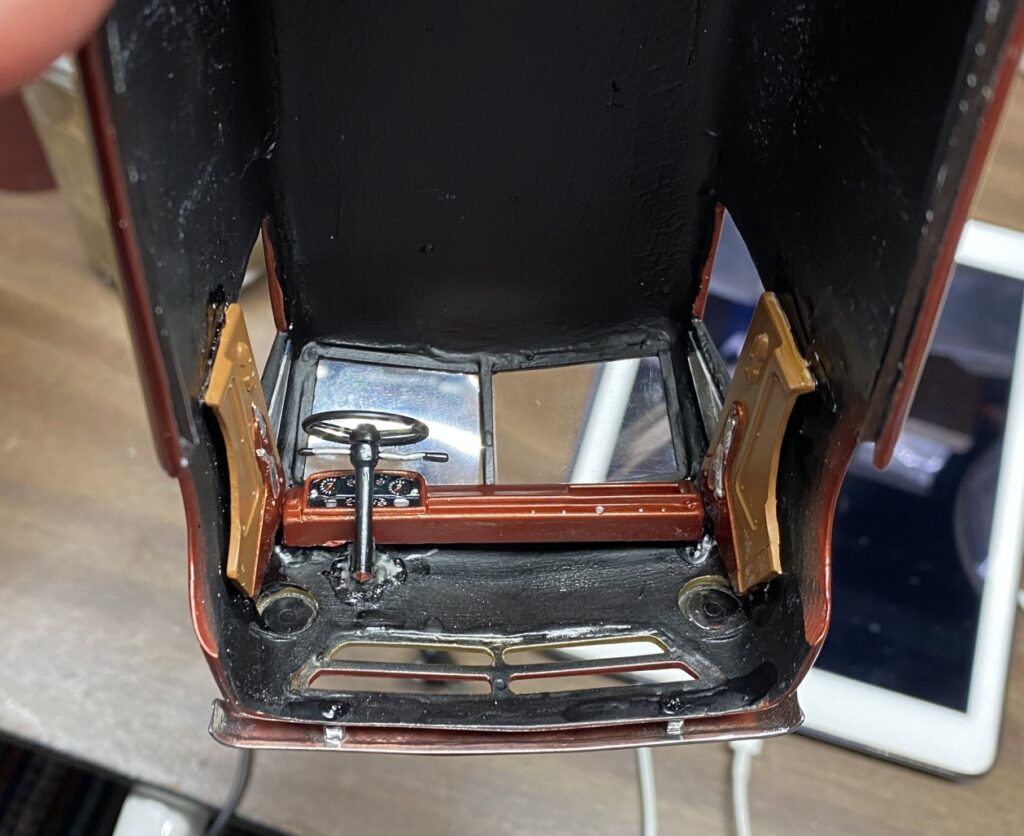
The chassis and interior are one and the same but took different turns throughout the build. Clearly, I needed to figure out how to tie the interior to the rest of the build. Of all the manipulations in this build, the interior is probably the most unrealistic part of the build? It’s also the hardest part to see.
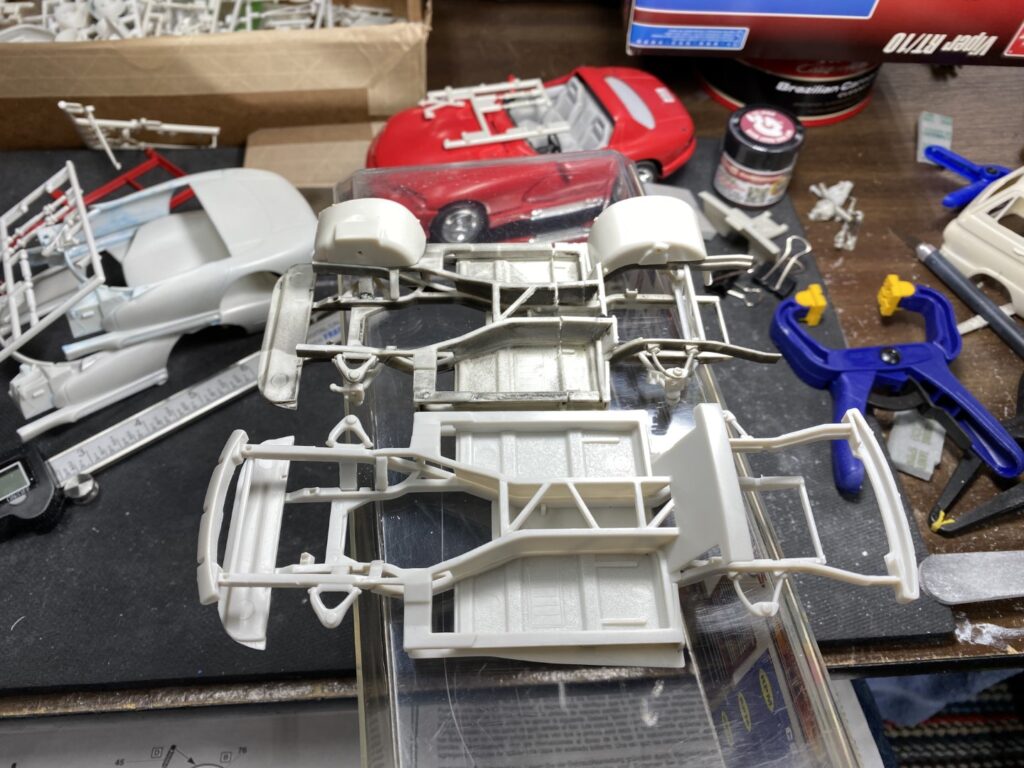
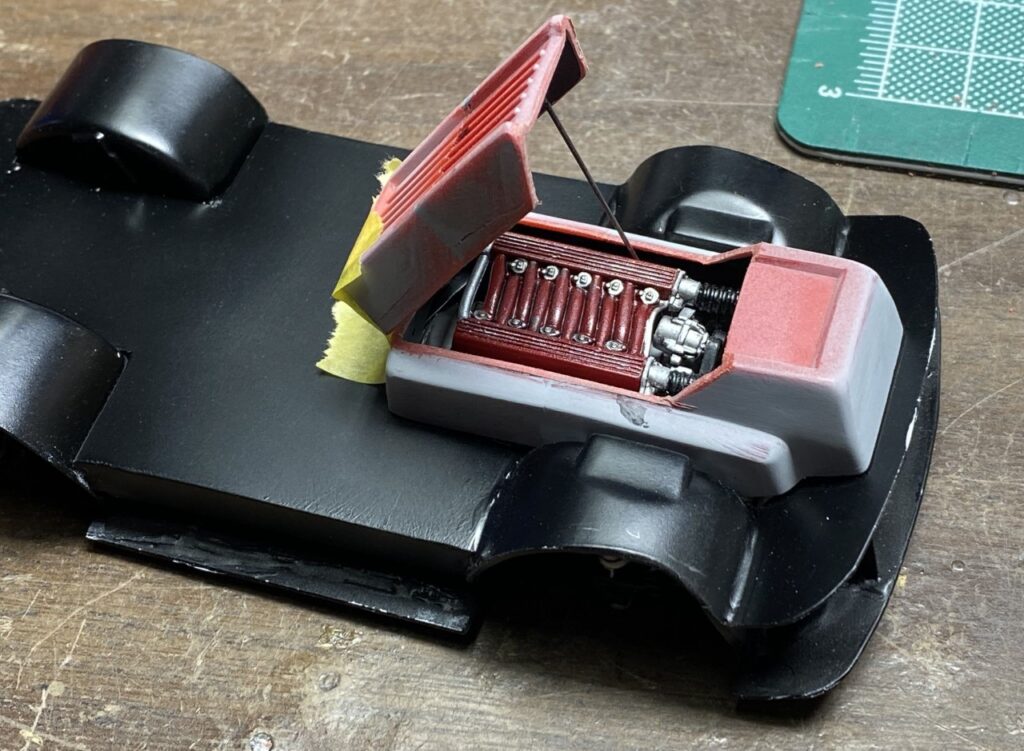
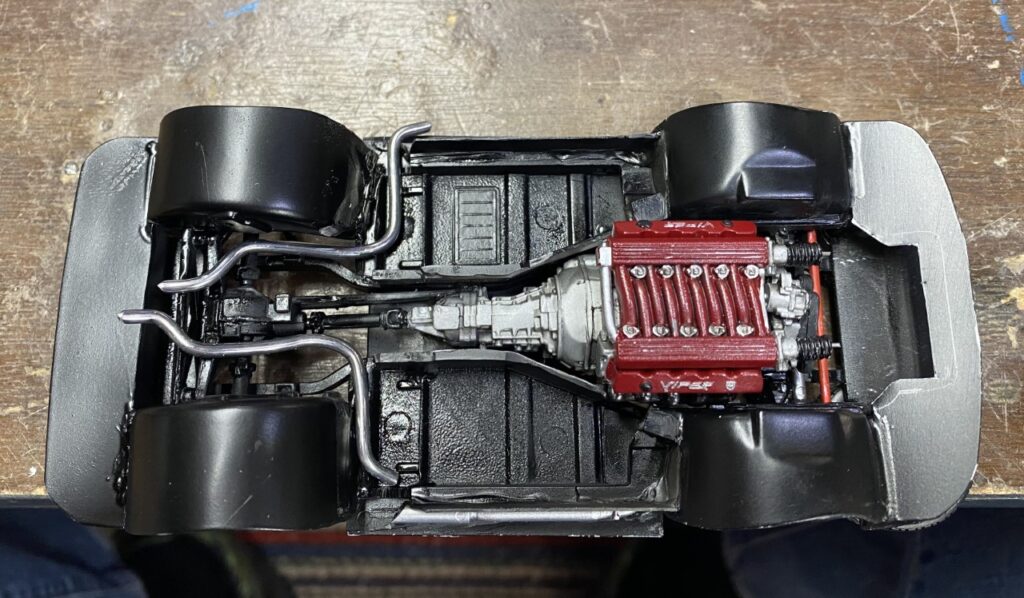
That being said, I combined two engine covers to make one that would fit over all of the engine parts. To create a “floor” I use sheet styrene to cover the top of the chassis. To make a “floor” for the driver/passenger space, I took cues from the original A100 floor and used a piece of sheet styrene which I supported with additional pieces. I spaced out the parts to ensure the grille opening was not compromised.

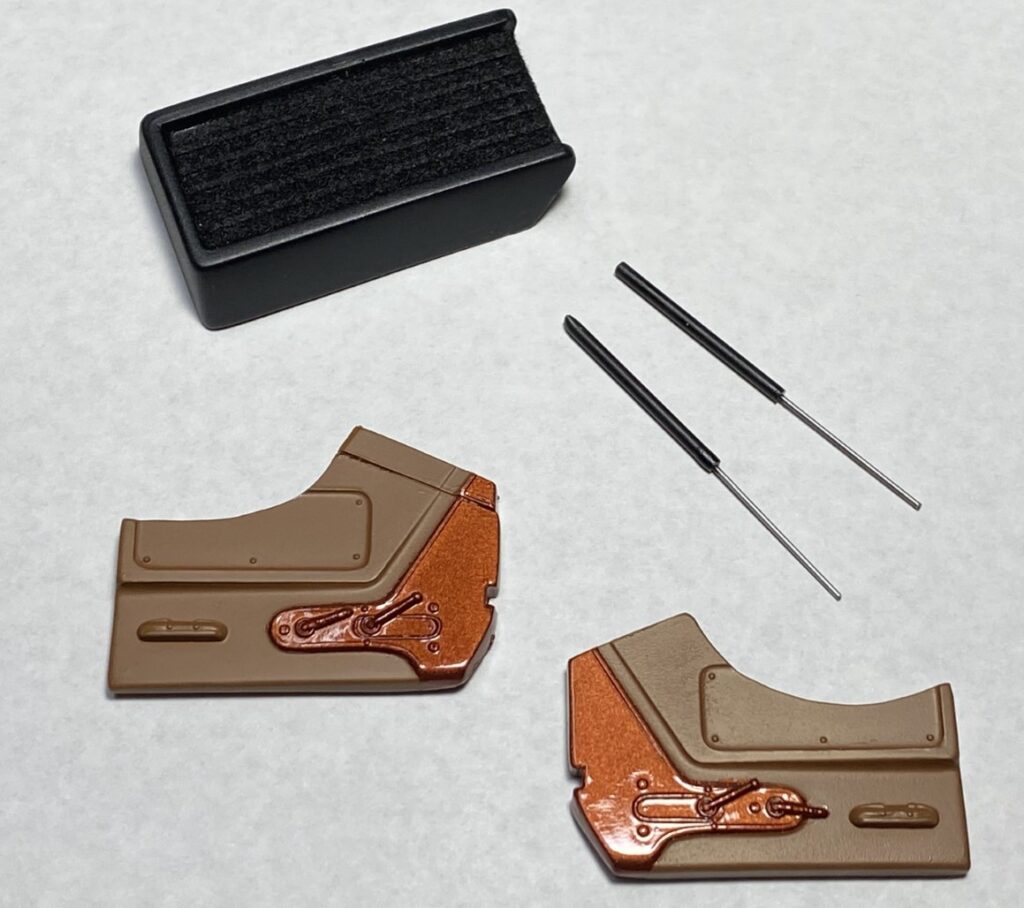
My original concept was to leave the engine covered. I wasn’t going to spend much time detailing the engine and covering it wouldn’t hurt anything. Then…I started detailing the engine. No longer wanting to hide it, and not having a solid plan to make the body and cover removable for display purposes, I decided to cut open the cover and hinge it.
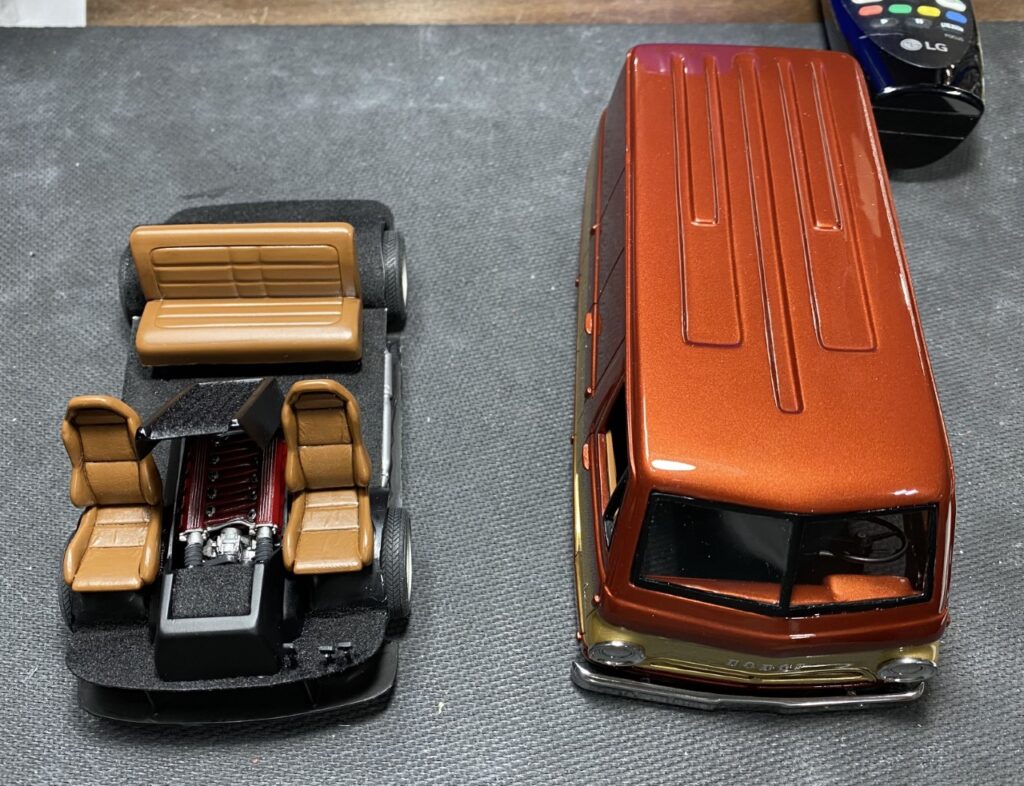
As the build progressed, the parts I decided to use changed. The interior was flocked, as well as the top portion of the engine cover. I used a bench seat from Ford Truck for a rear seat and the Viper seats from the donor kit. They were painted saddle tan.
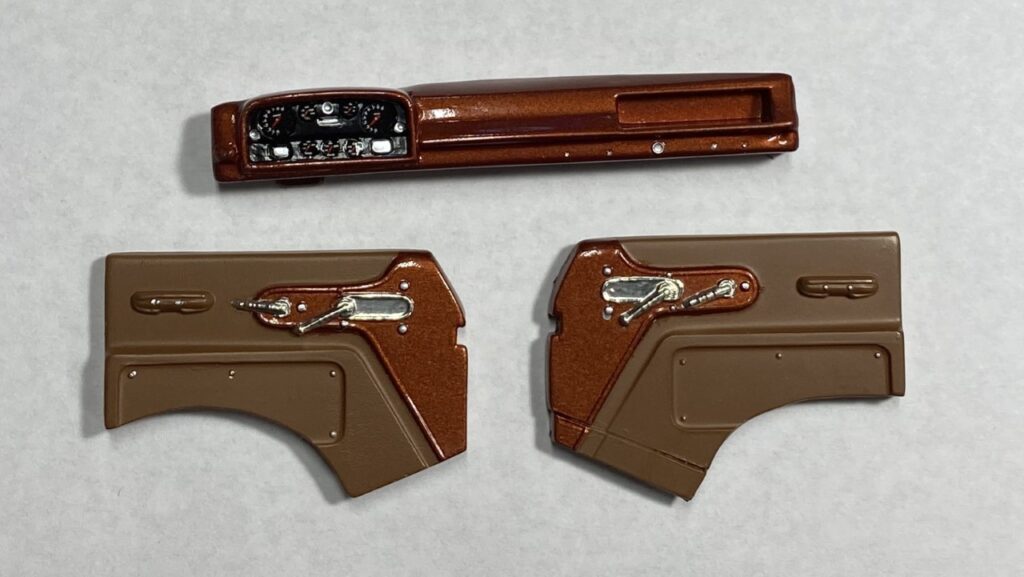
To give the engine cover the illusion that it was made to pop open, I made pneumatic cylinders with brass tube and wire. I also painted the original door cards from the Little Red Wagon kit.
The Viper Van needed a more elaborate instrument cluster. My stash provided a Lamborghini Diablo instrument cluster. I used generic gauge decals for detail. The rest of the details were completed with foil and silver paint.
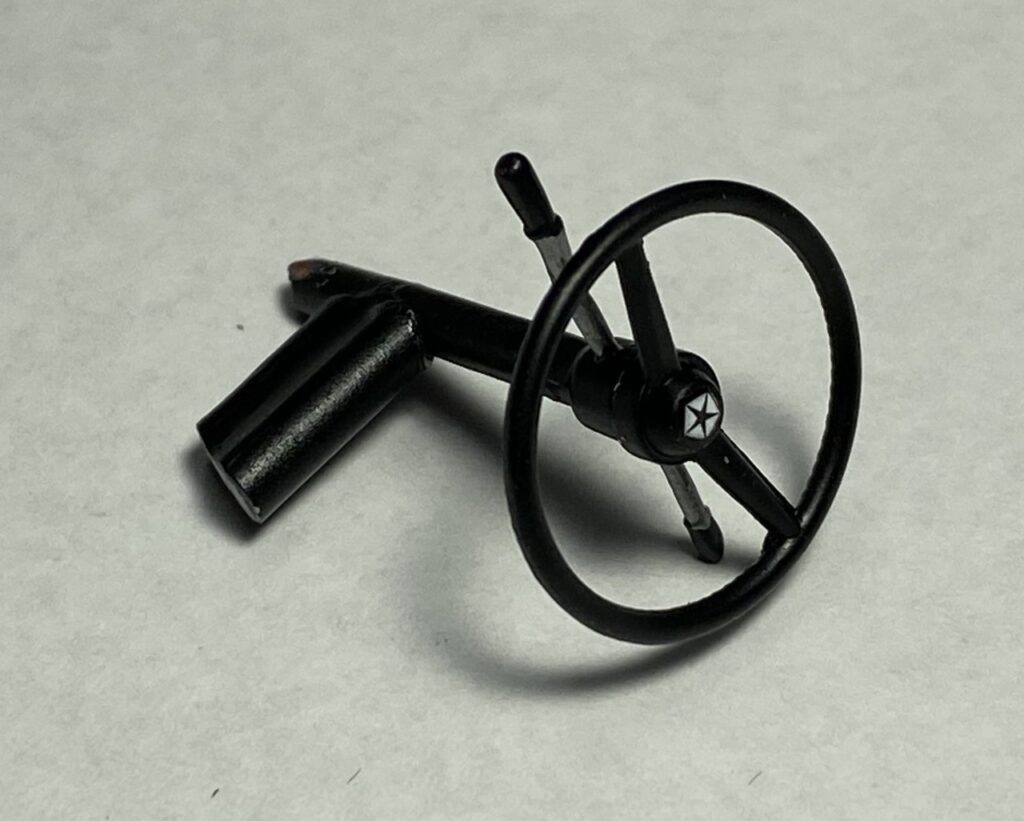
This is probably the wonkiest part of the build. Looking at how the steering wheel is attached in the Little Red Wagon, and how poorly it was designed to fit, I just did my best to make it attach to the body. Through some trial and error, I trimmed and added pieces of sprue to give the wheel the correct angle and height. Lastly, I added a penta-star decal from another kit for the horn button.
To wrap up the interior, all of the pieces were attached to the body and it was ready for final assembly.
The engine hatch and pedals were attached. It was time to bring everything together.
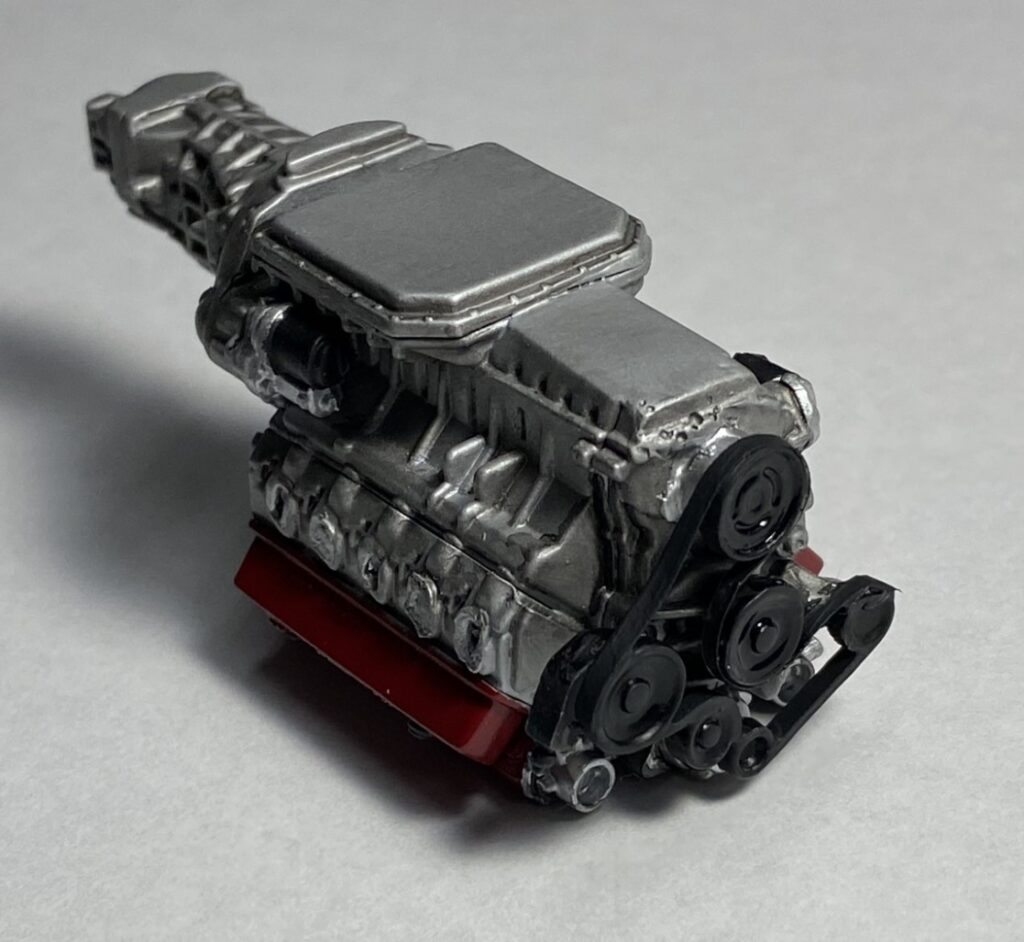
Engine/Exhaust
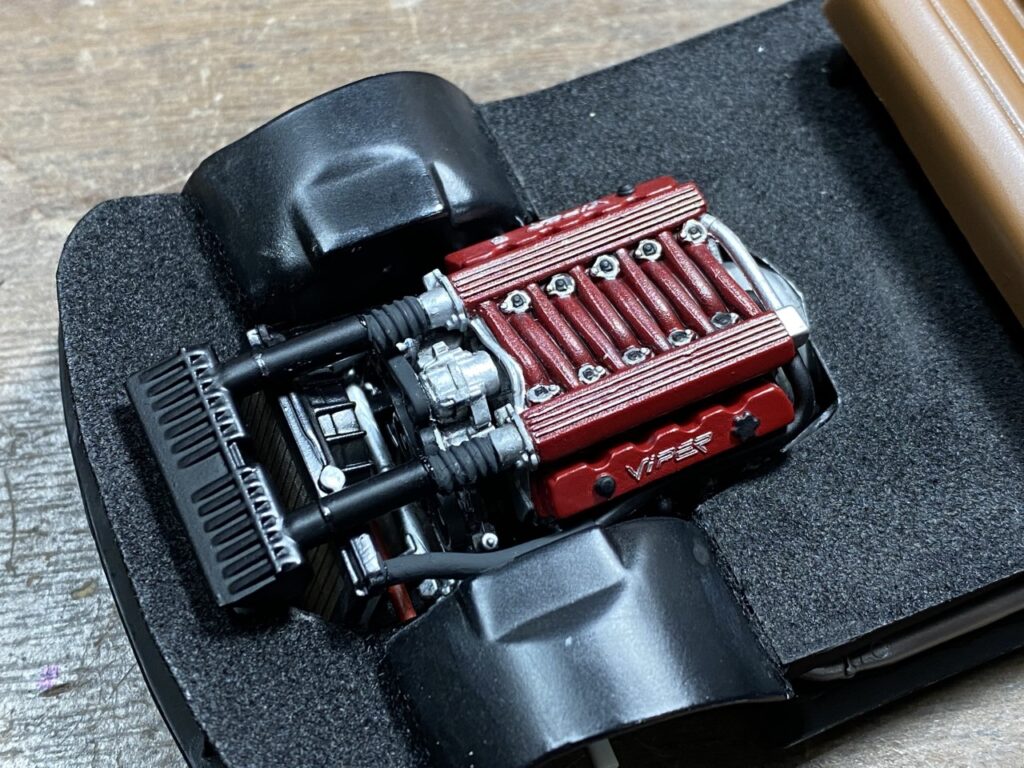
The direction of this build hinged entirely on using the Viper’s V10. Had I not thought about using the V10, I wouldn’t have gone down the road of using the whole Viper! One of the two AMT Viper kits I picked up from Ebay, had been partially built, badly. The engine was a glue bomb. Considering that I plan to build a Viper from one of the kits, I chose the dodgy parts for this build. The difficult to repair damage is hidden making it perfect for the project.
For the most part, the engine looks good. Later, I would cut out the alternator and remount it correctly.
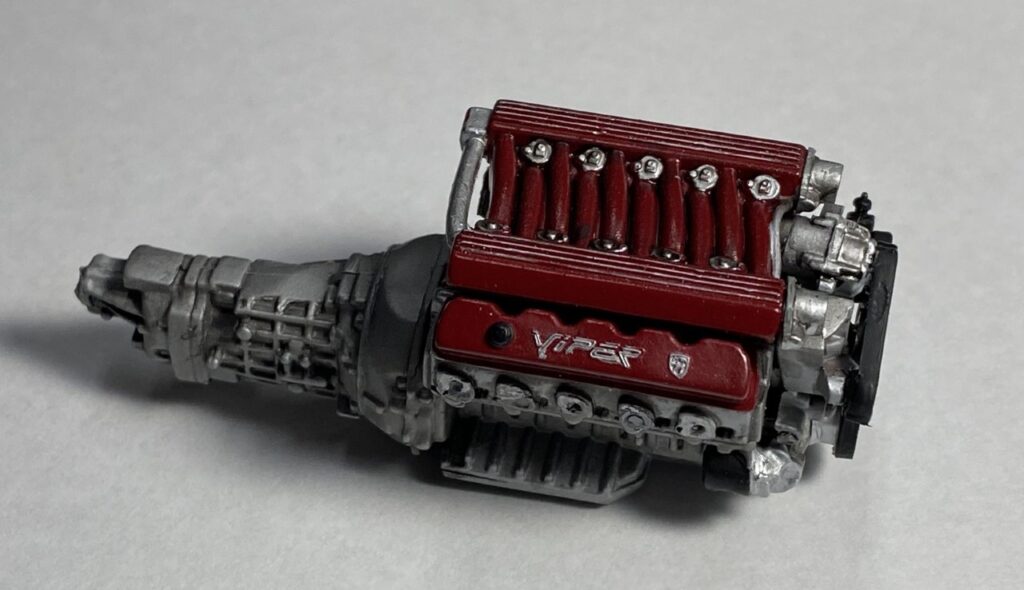
Where the engine glues to the chassis, is the ugly part in this picture. One other repair that needed to be made is to make a new accessory belt. I used a strip of masking tape to finish the belt.
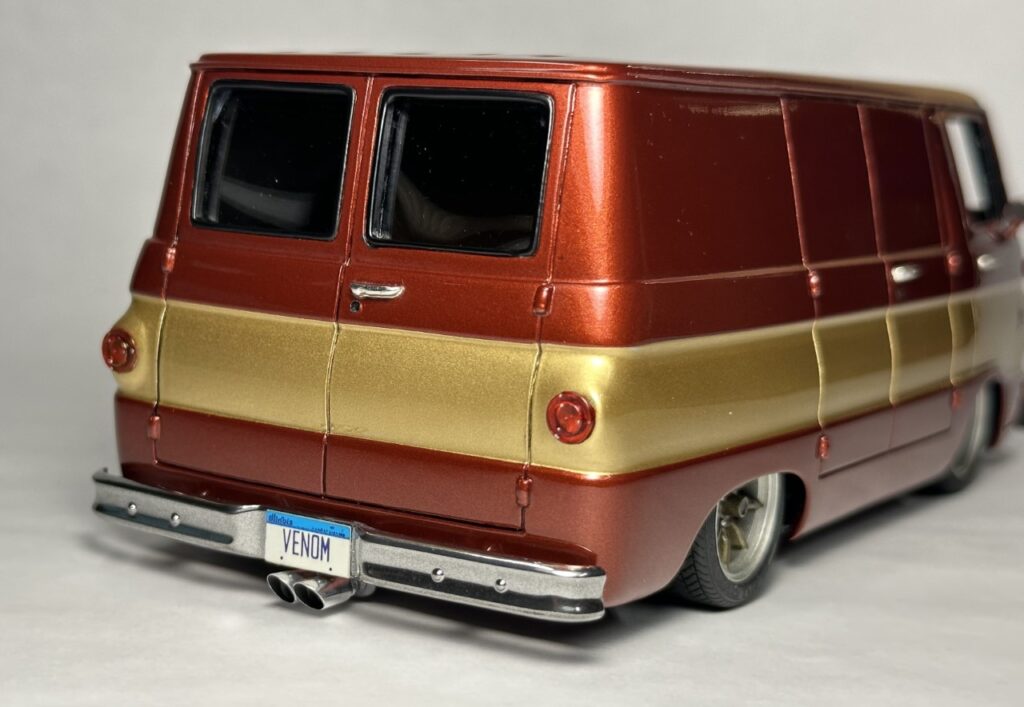
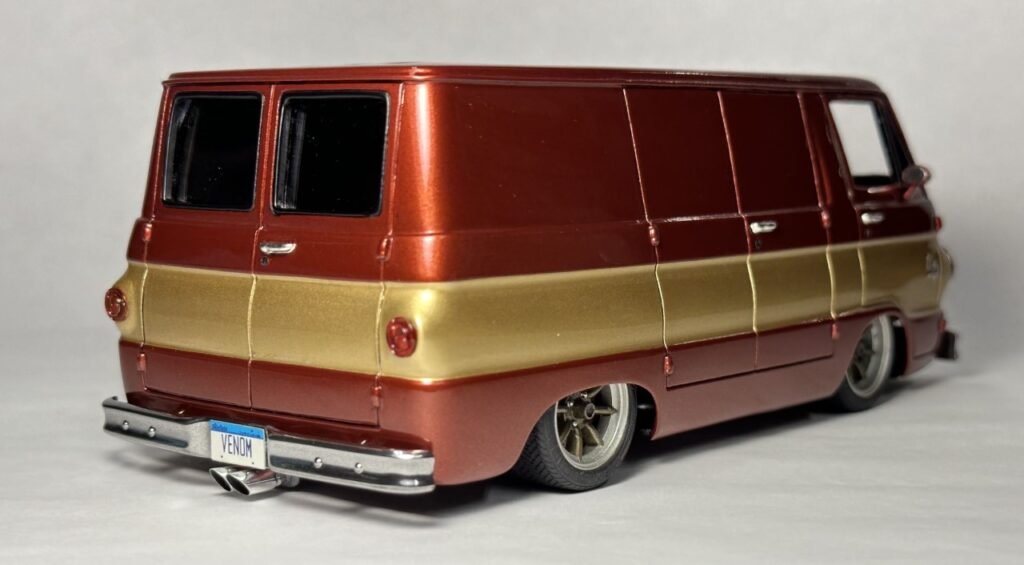
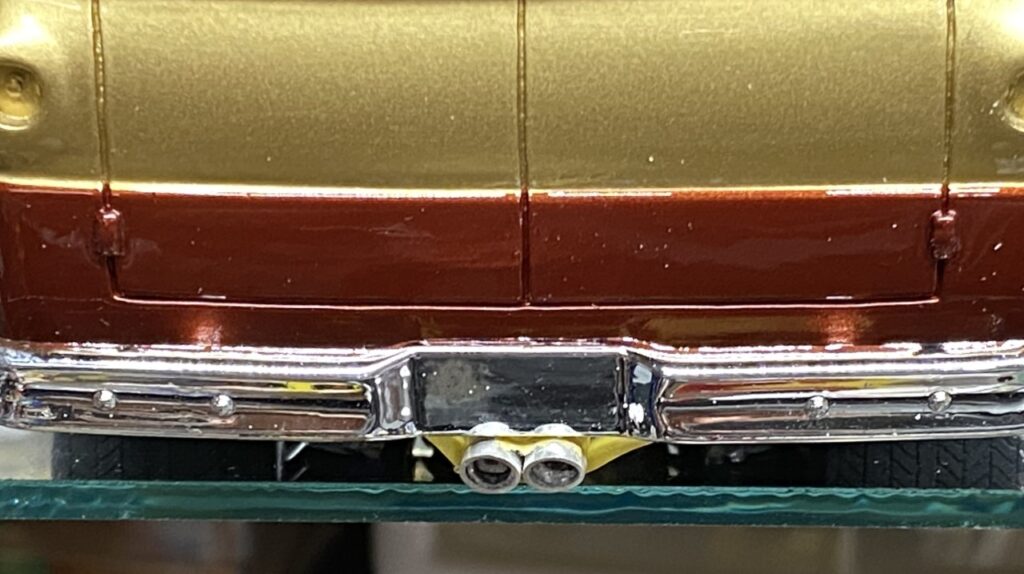
The donor Viper kit as an RT10 Roadster with side pipes. I considered running the pipes through the body sides, then just inside the wheel well, but in the end, I decided to route the exhaust to the back like a Viper GTS. I had to cut away the interior/chassis to route the pipe from the sides. This exhaust routing is how it was done on the 1:1 GTS.
Not that it matters, I wanted to show that the exhaust is connected from the manifold all the way back to the muffler in the rear.
The muffler was from a C4 Vette. I modified it to accept the solder piping and made a pair of slash cut tips to wrap it up.
Test fitting the exhaust revealed that this was going to look excellent. Twin tips out of the center just like the GTS.
The radiator is from a concept Mustang kit. The airbox is the original Viper part but cut and extended with aluminum tubing. I was able to use the original Viper radiator hoses to attach to the Mustang radiator. By this point, corrections were made and touch up paint completed. Time to move to final assembly.
Wheels
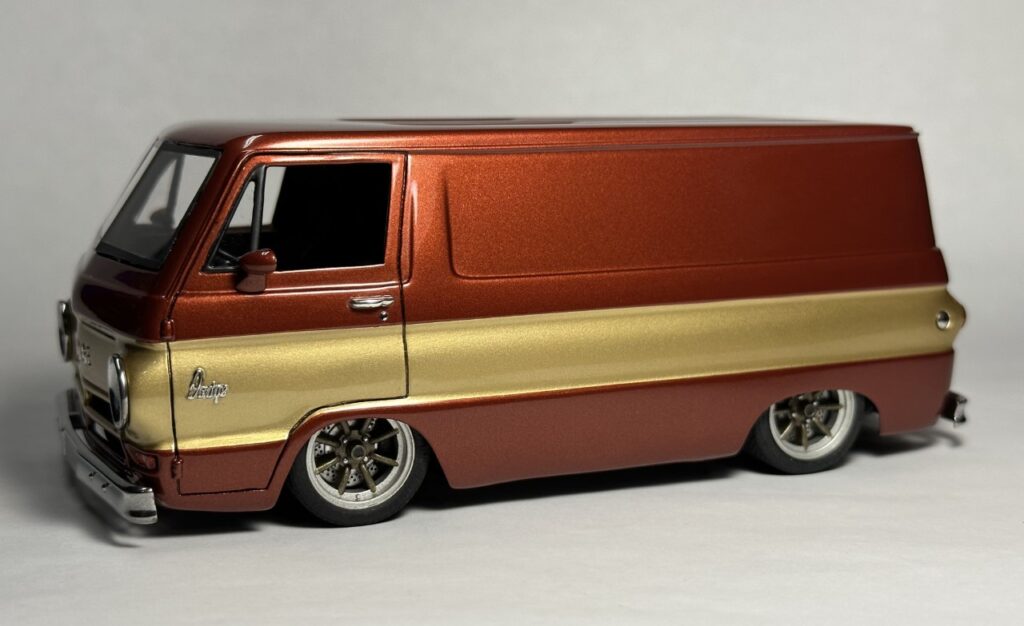
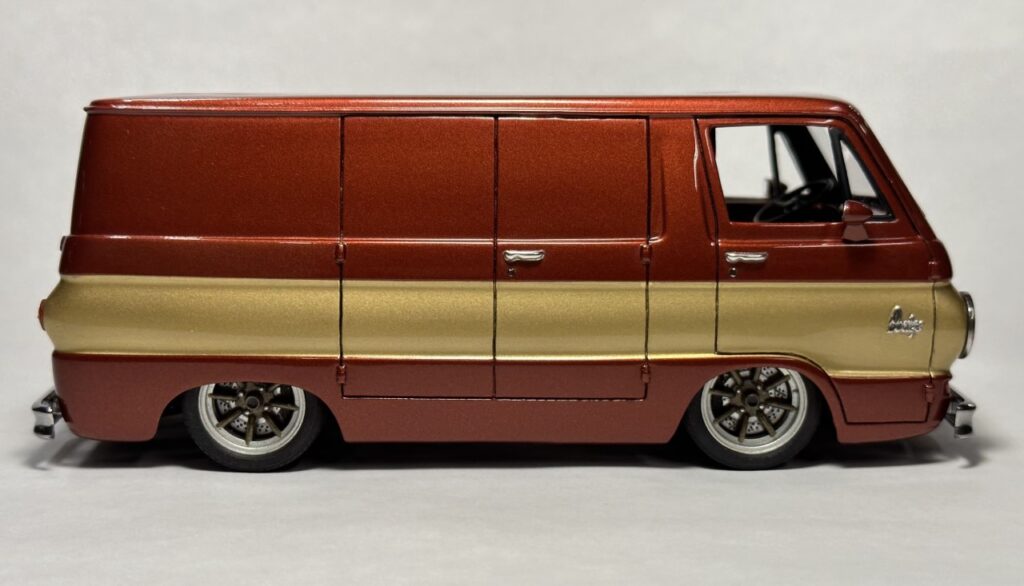
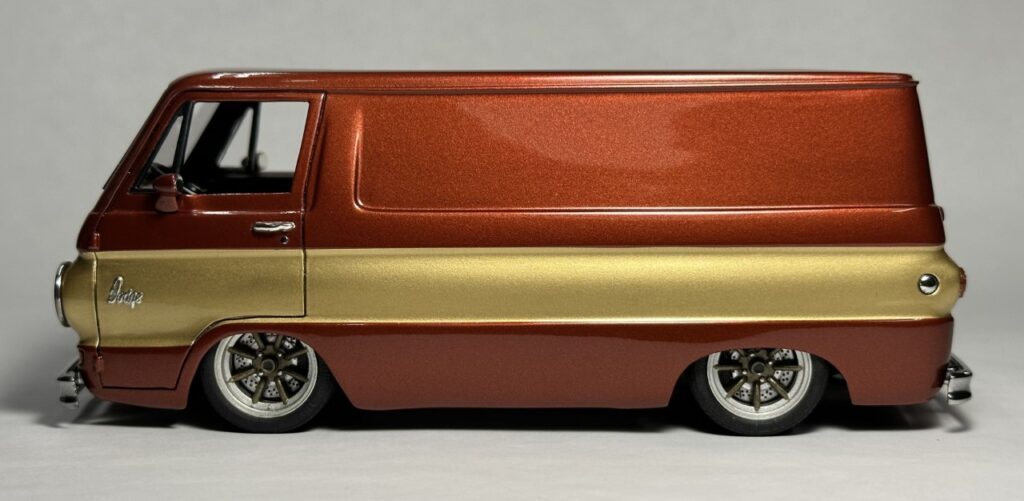
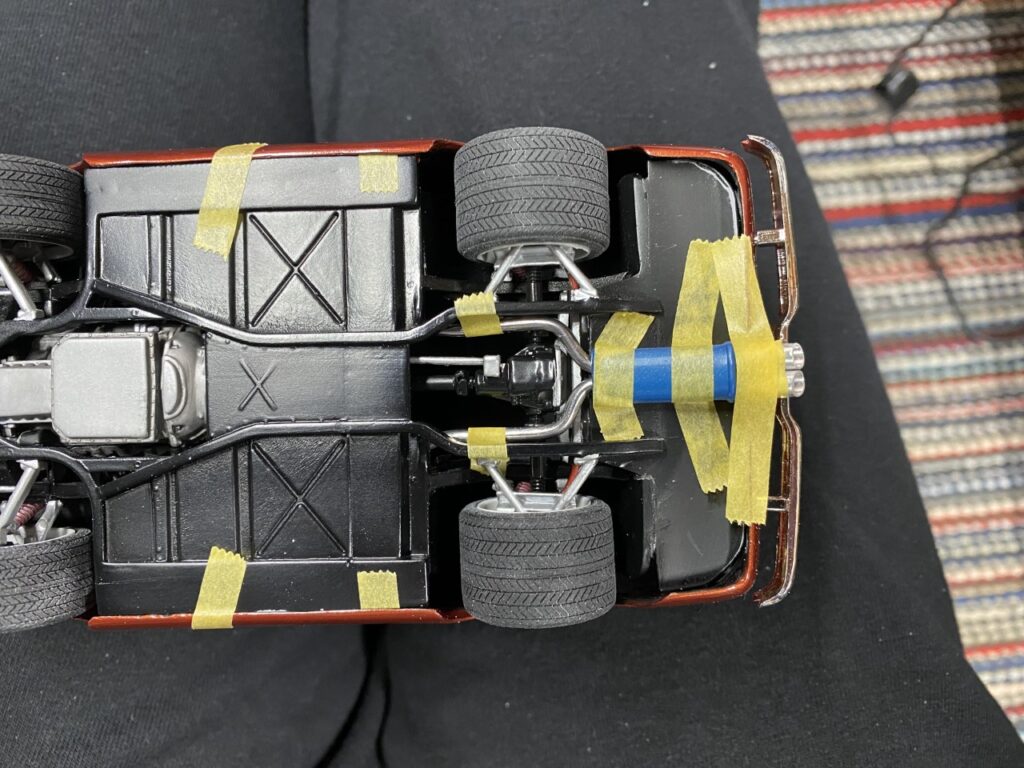
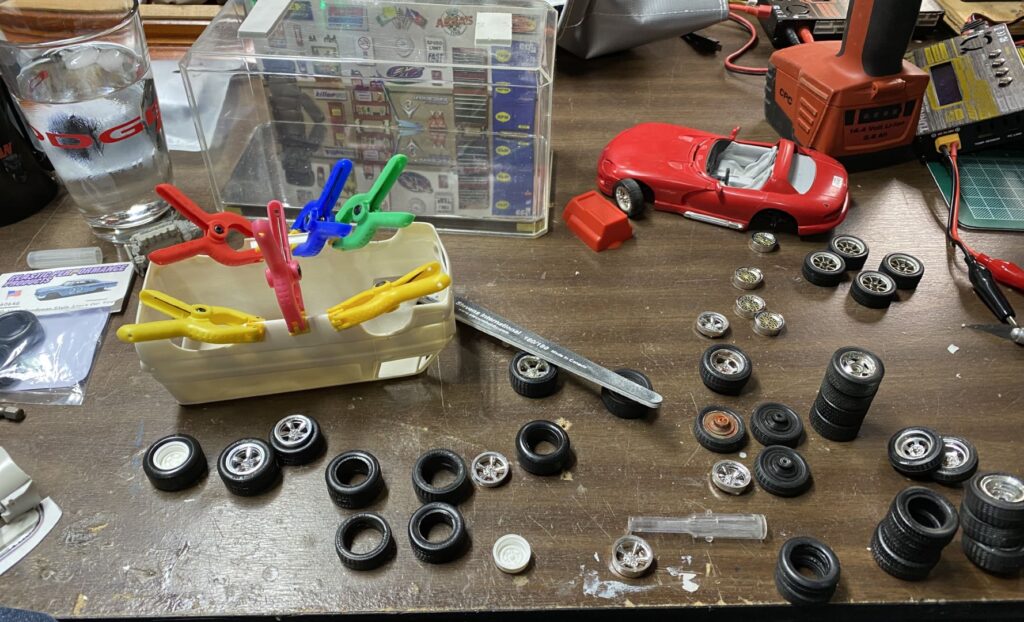
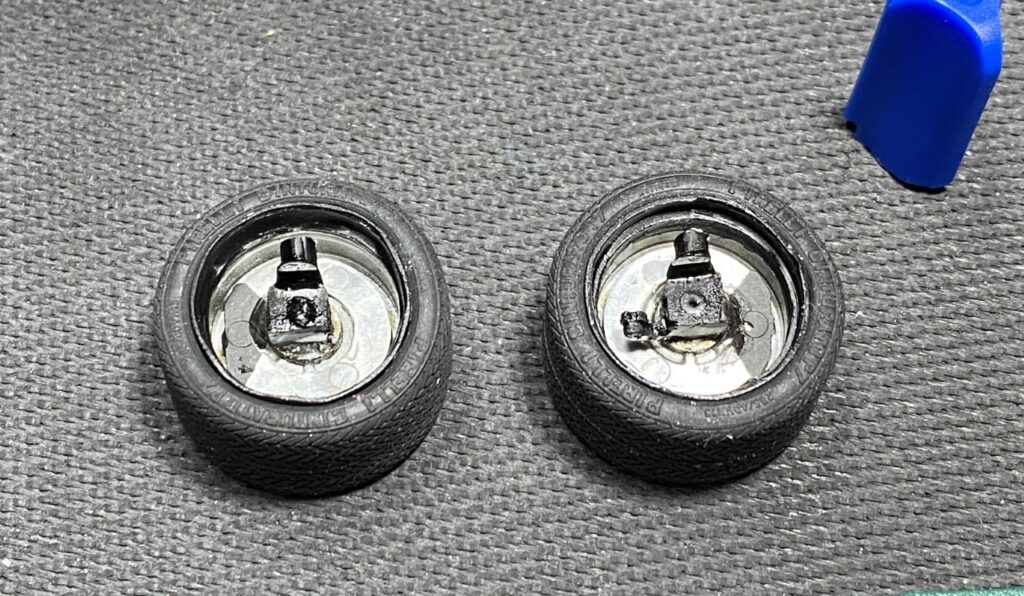
Wheels can make or break a build. Choosing a classic wheel will ensure it will never be dated. I really struggled with the best option and tried different wheel/tire combo until I finally settled on the Watanabe wheels. (bottom set) They had the right diameter and tire size to fit in the wheel wells without looking odd.
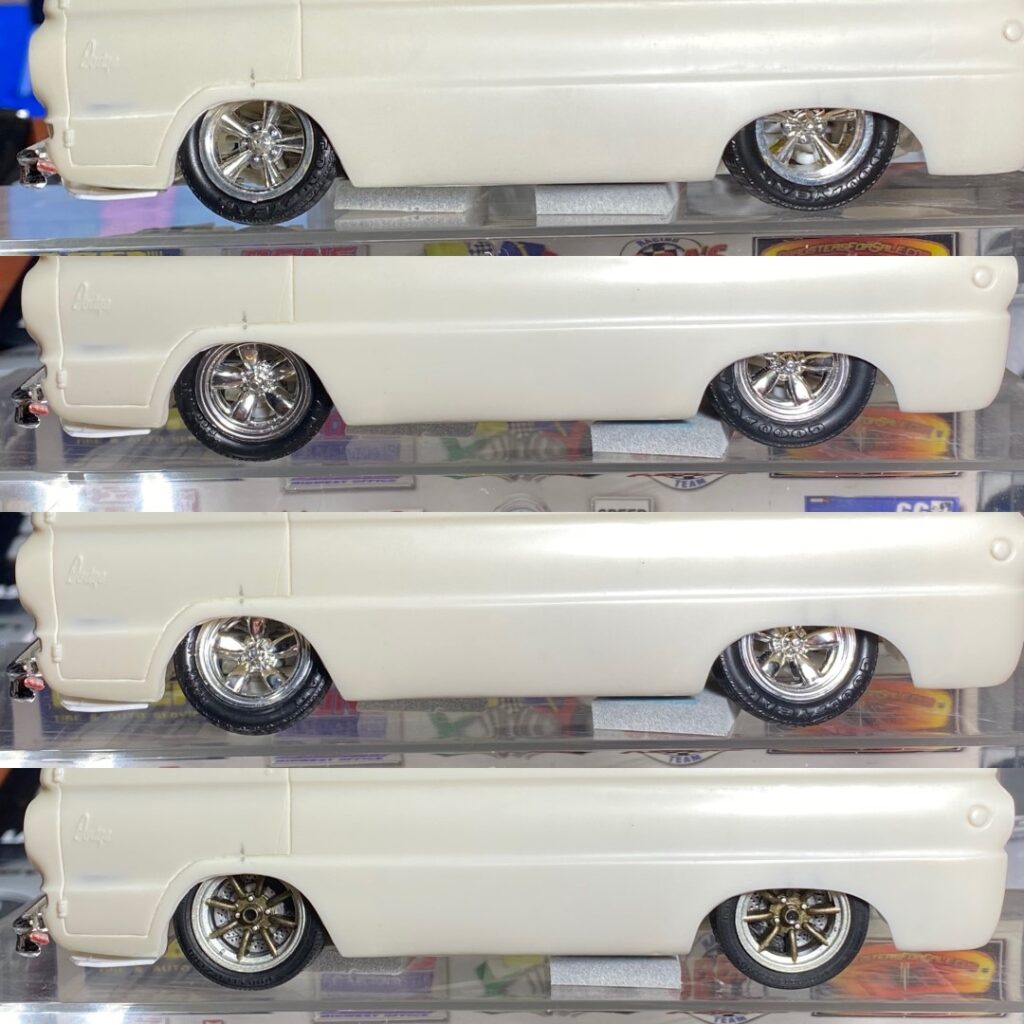
The Viper wheels would have been a really solid choice and really hammered home the ViperVan concept. Alas, these were from a Snap tite kit (from another Ebay buy) and I wanted to use them on the other Viper kit. The AMT Viper wheel and tire combo are really not scaled properly. Moving along…
I had another set of Watanabes that had 345mm rear tires. The wheels were the wrong offset. Using the finished Watanabes, I added material to the back of of the wheel to hold the wider front and rear tires.
Selecting the wheels and having them ready for install was a significant relief for this project.
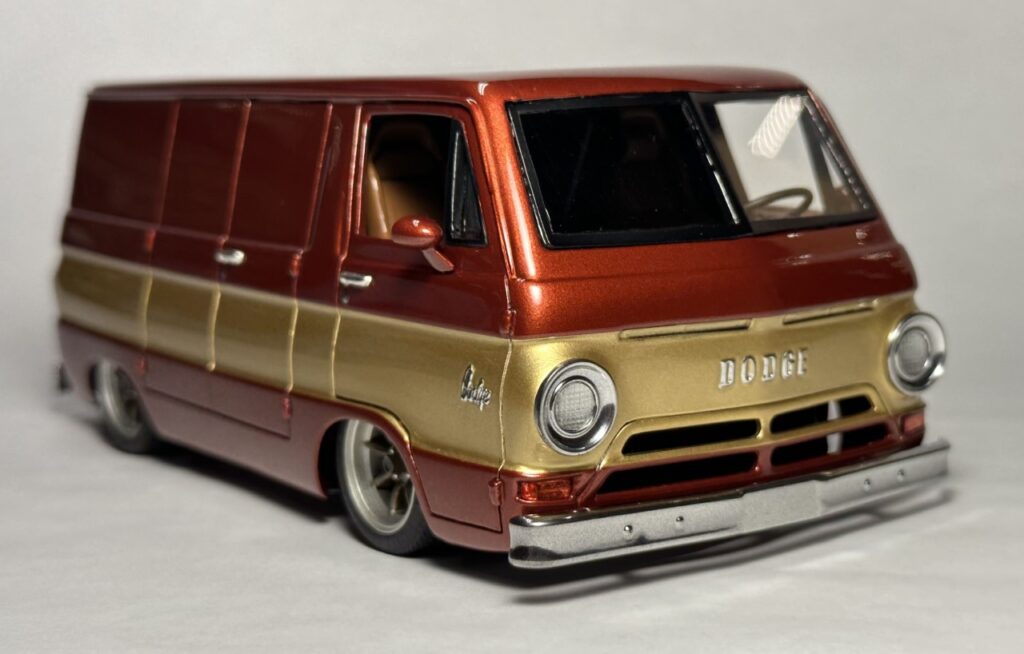
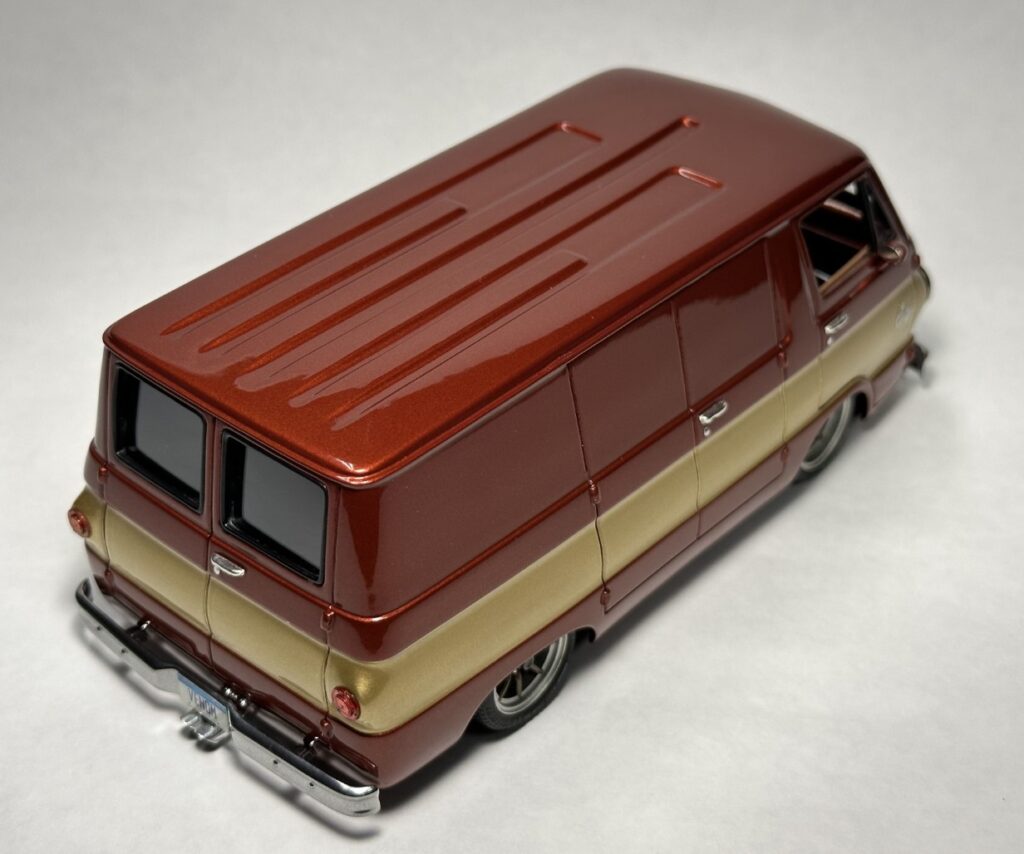
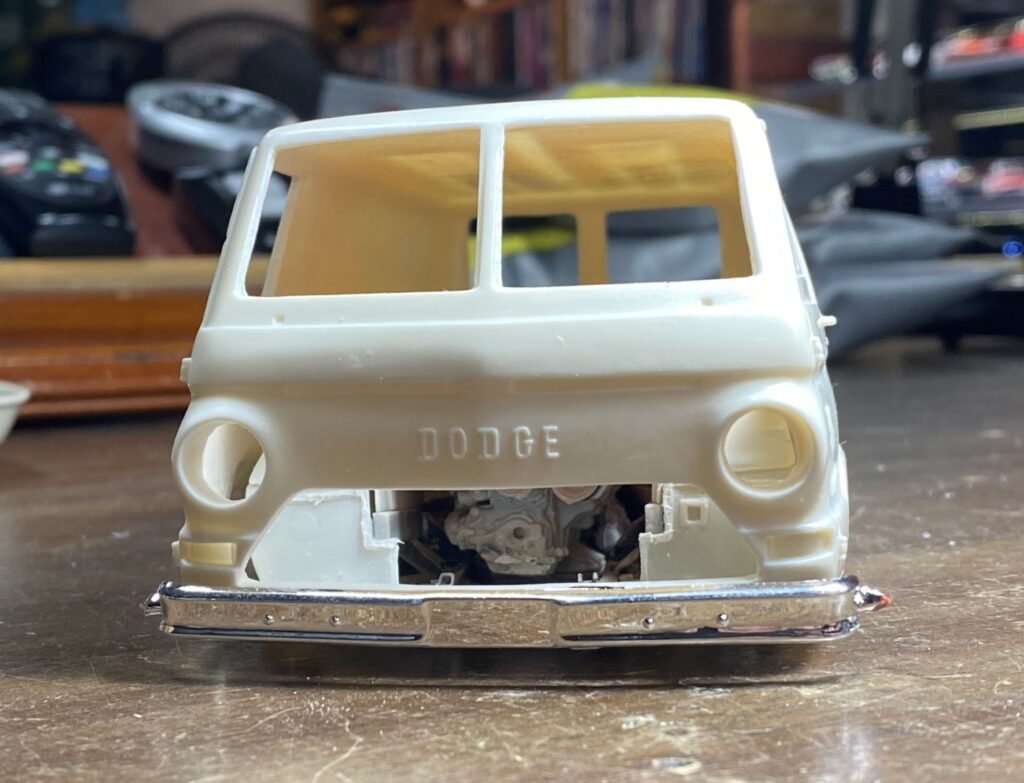
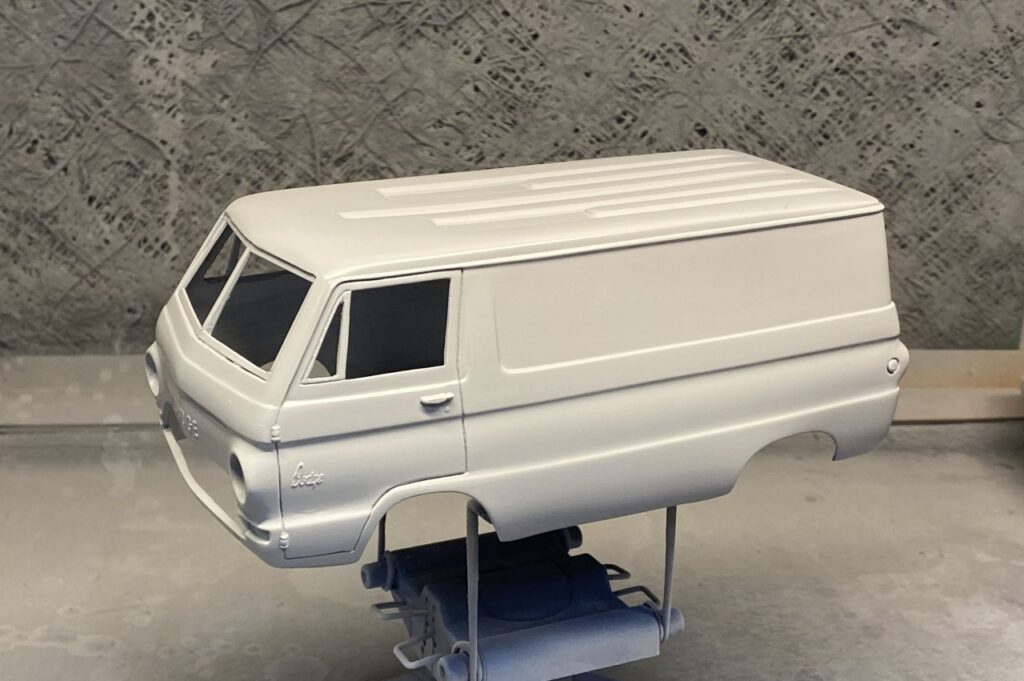
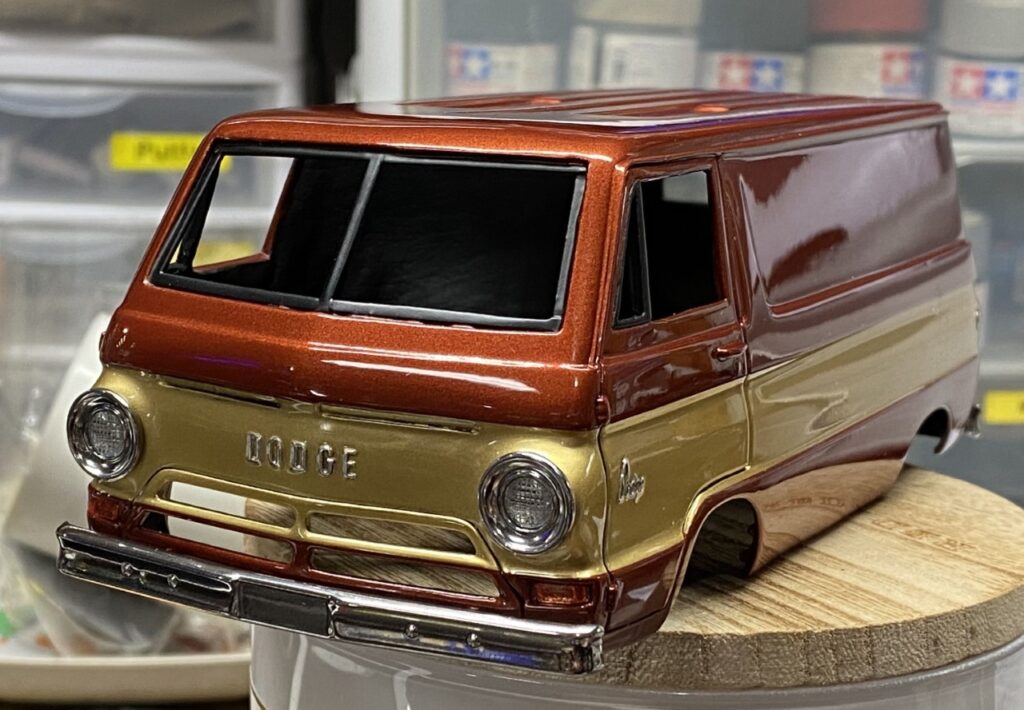
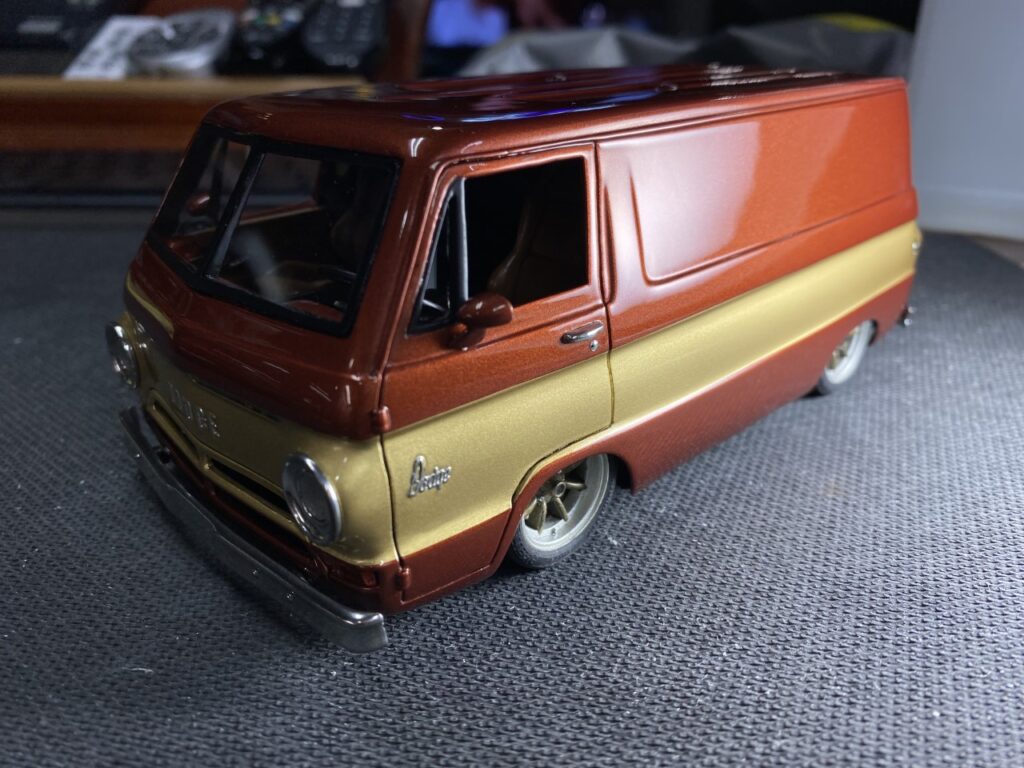
Body
Finally! I’m going to write about the body. Fundamentally, it is an unmodified Jimmy Flintstone A100 van body. Most of the prep work involved deepening panel lines and modifying the windshield opening to facilitate glass installed from the outside. To mount the body to the highly modified chassis, I added styrene box tubing glued to the bottom edge of the body.
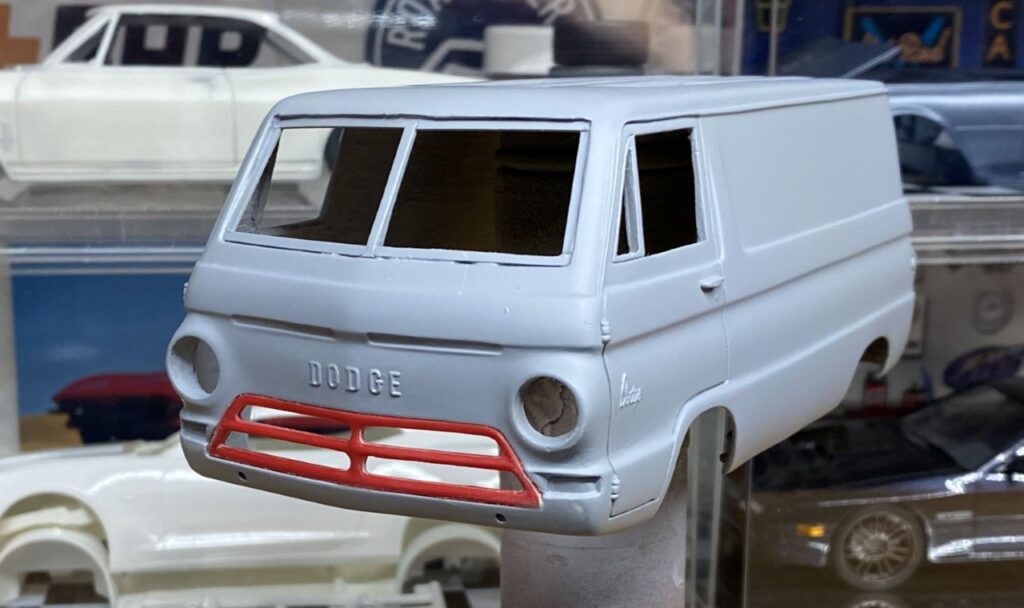
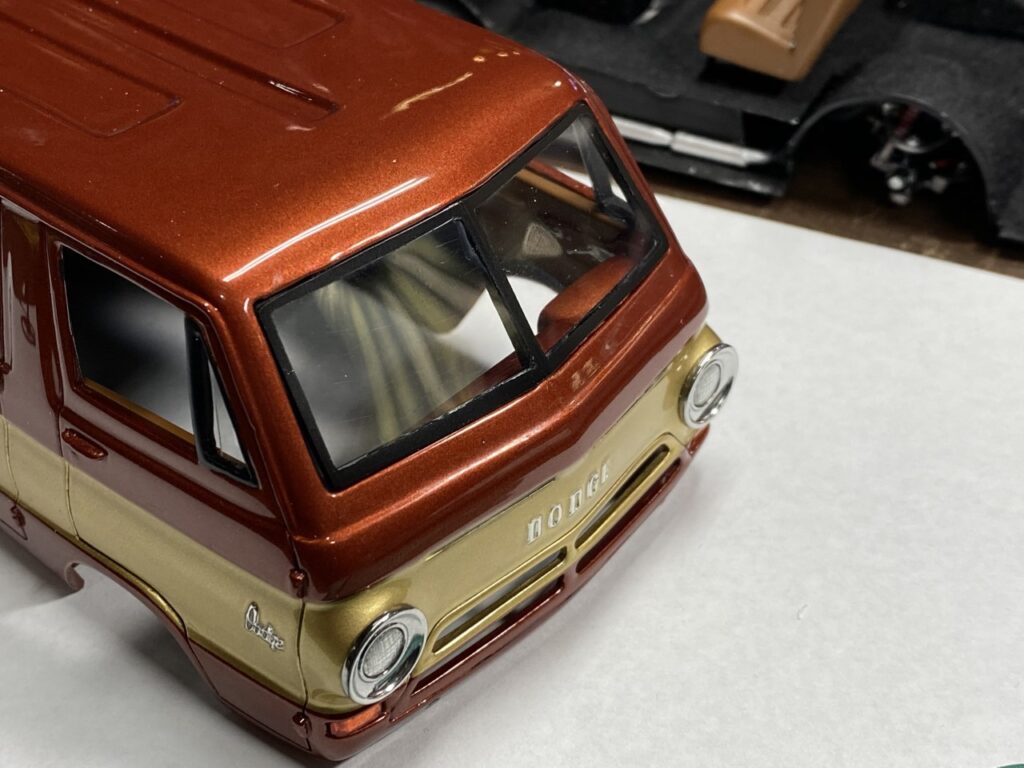
The original windshield from the Little Red Wagon kit was available but I chose not to use it. The resin casting is thick and trying to get the kit glass to fit seemed like more of a challenge than it was worth. After reviewing photos of 1:1 vans/trucks, I decided to modify the opening to hold a piece of clear acetate from the outside. The process started by gluing strips of styrene to the opening. I also thinned the center post to match the depth of the strips.
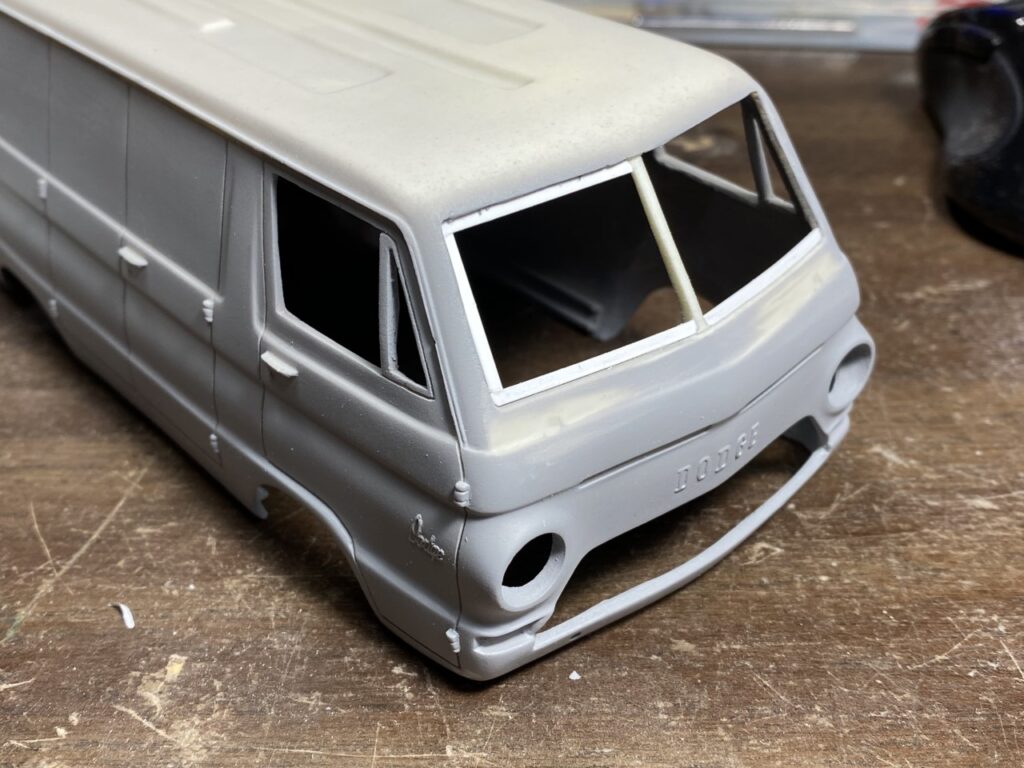
With the windshield frame complete, it was time to primer the body and start spraying color!
While researching references of the van, I found that the grille can be painted body color. Before I started spraying color, I added the grille and primed it. Going this route uncovered the fact that the grille did not fit the opening very well. I was able to fit it into place before paint ensuring no mistakes during finishing. At least with the grille!
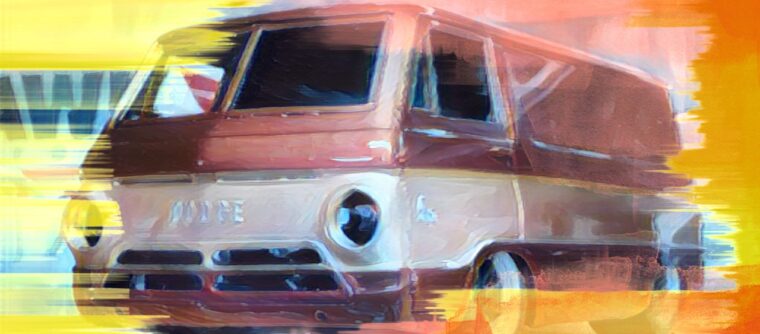
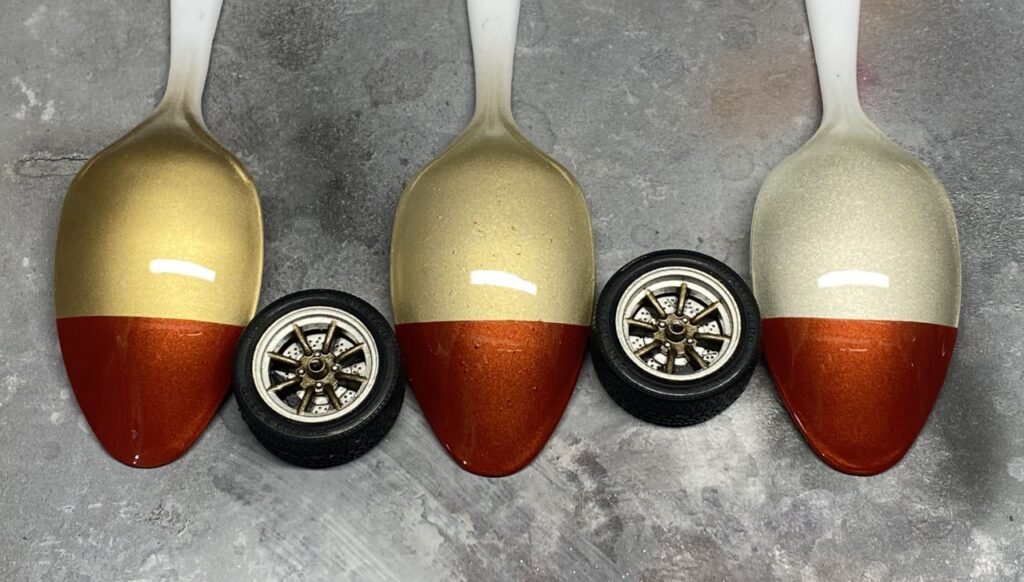
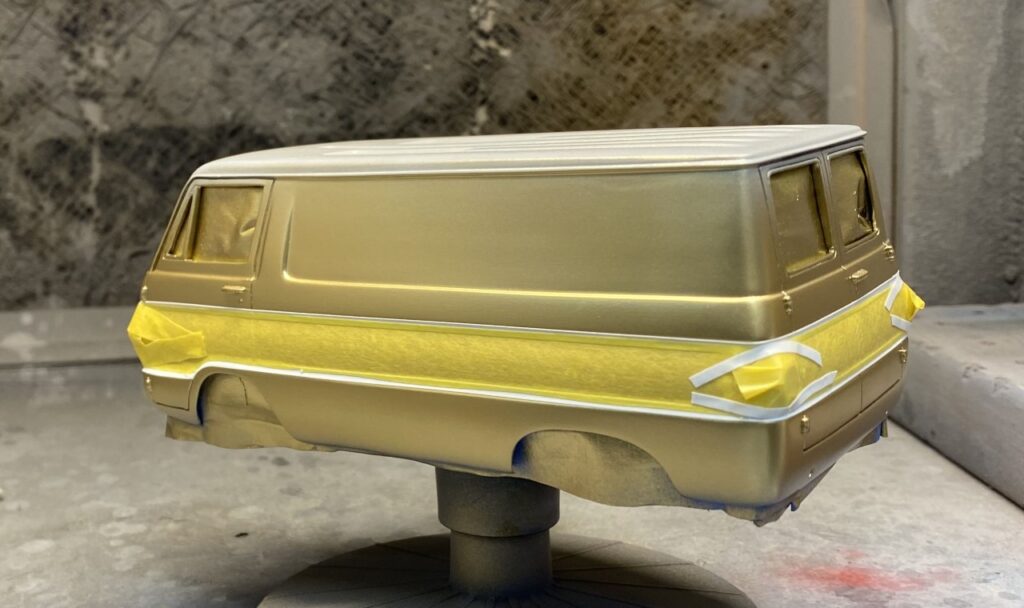
Colors…there are infinite options. I bought Hot Rod Rootbeer a few years ago and had no question that it would be the base color. The van/truck can be a two-tone and I felt that I needed a color that complimented the red. I prepared three samples with Tamiya gold, champagne gold and titanium gold. My heart was set on Titanium gold (far right) but after reading out to those close to me, I opted for gold. This was the best choice!
To avoid having to paint the interior after finishing the body, I painted it black and masked it before spraying gold.
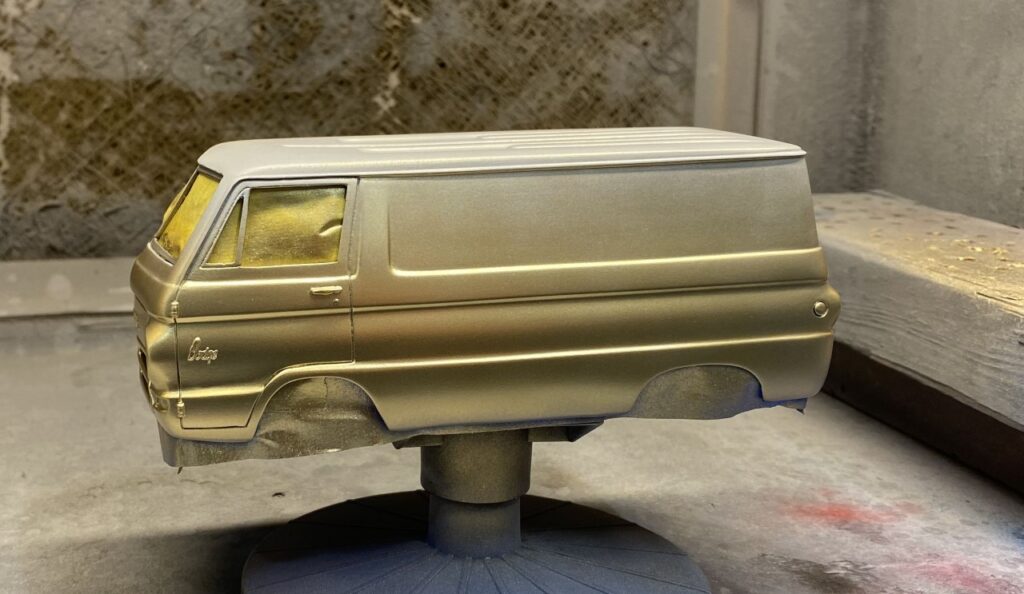
Following the seam in the body work with Tamiya thin tape was very straight forward.
Before spraying the red, I sprayed primer to ensure a uniform color. Unfortunately, and I knew better, it created a primer ridge along the primer. After spraying color, and unmasking my mistake, I cleaned up the ridge, masked and sprayed again. Fortunately, my repair was successful and I was able to move on.
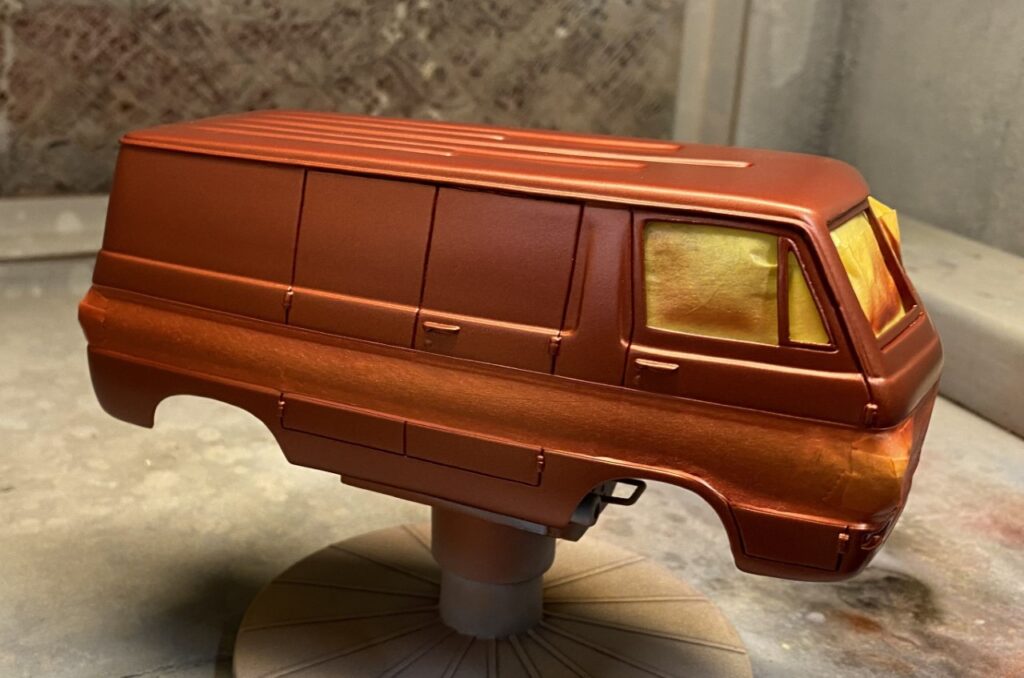
Knowing that I spray the clear a little thick, I decided to foil the Dodge script and lettering. By doing this first, the detail is still crisp and the foil will be protected by the clear.
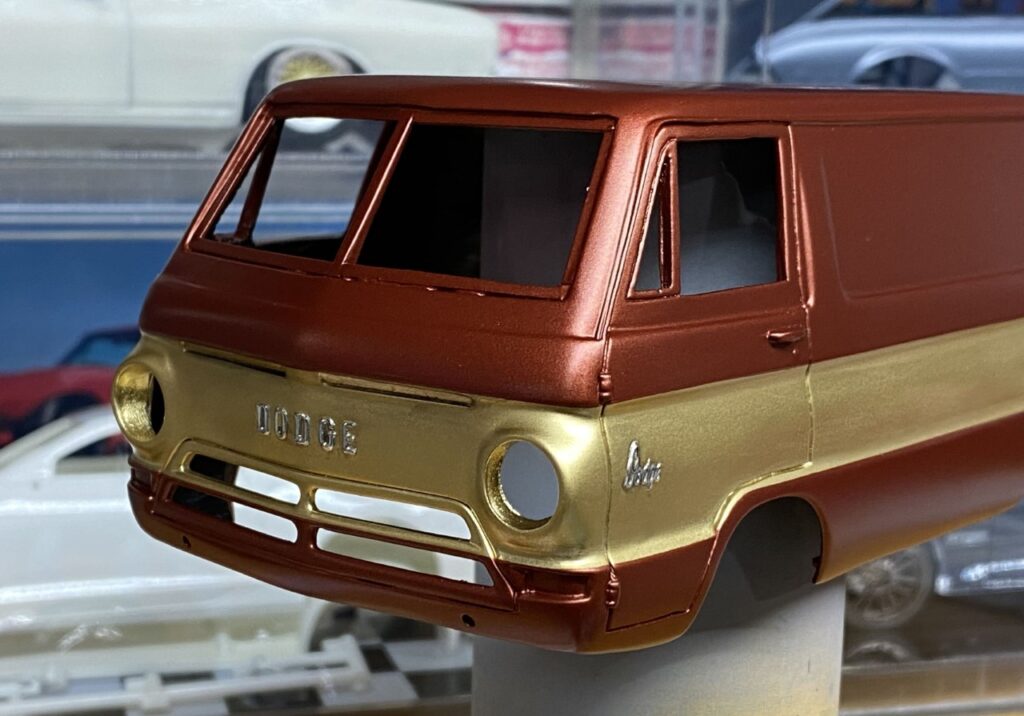
Once complete, I sprayed a couple of coats of 2 part automotive clear. The color combo absolutely pops under the clear!
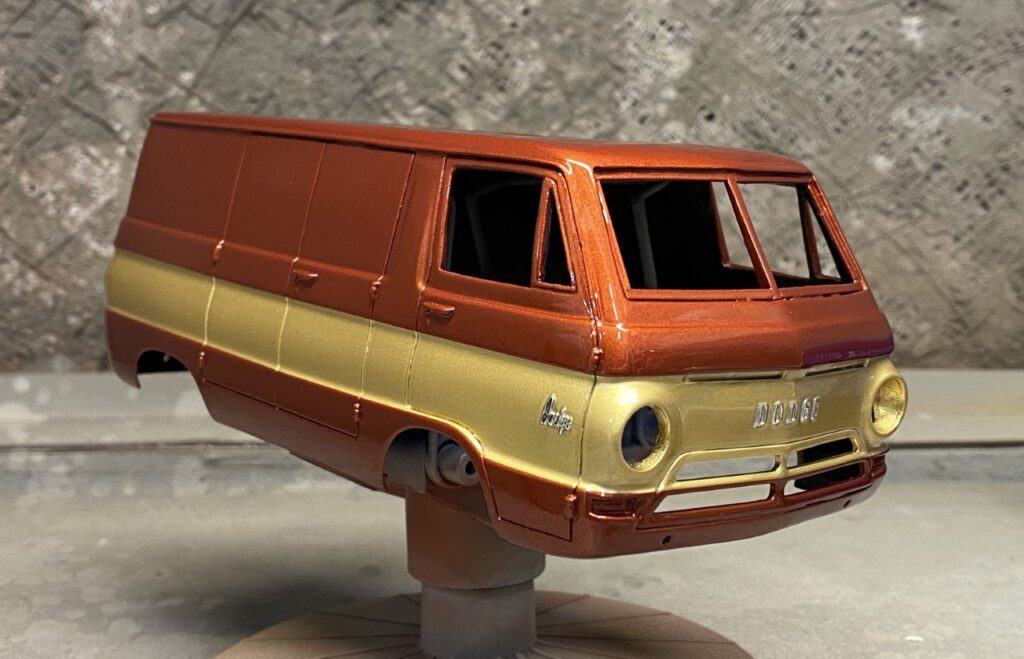
All of the chrome parts were stripped, prepped and then re-chromed with testors gloss black enamel and Spaz Stix chrome paint. I also masked and sprayed the window trim.
Now that the body was rounding the last corner to the finish line, I needed a windshield. I started by fitting a note card to the opening. Once I was satisfied with the fit, I transferred it to clear acetate.
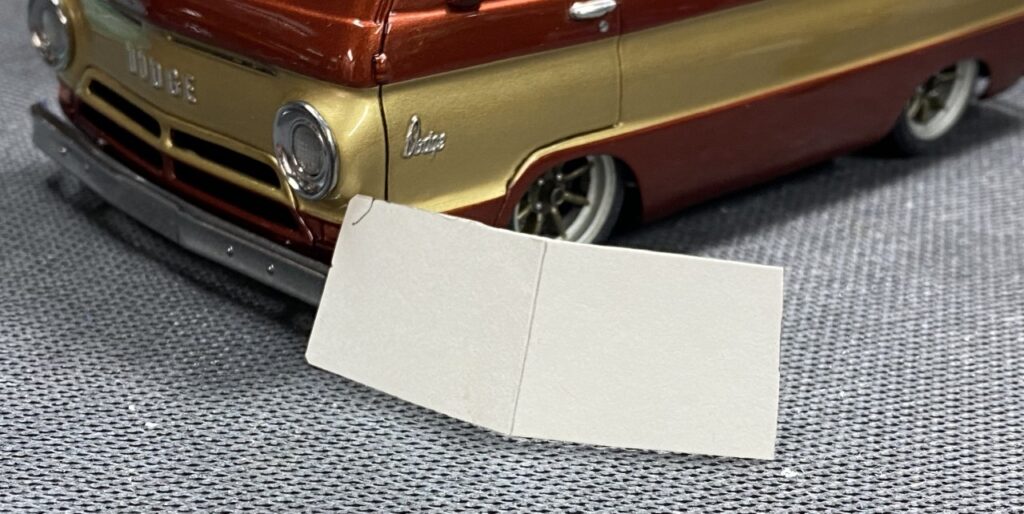
It wasn’t a perfect fit but for my first attempt at custom windshield, I was pretty happy. I taped the glass in place and used parafilm to mask the “seal” edge of the glass. Using light and plenty of eyeballing, I cut out the mask.
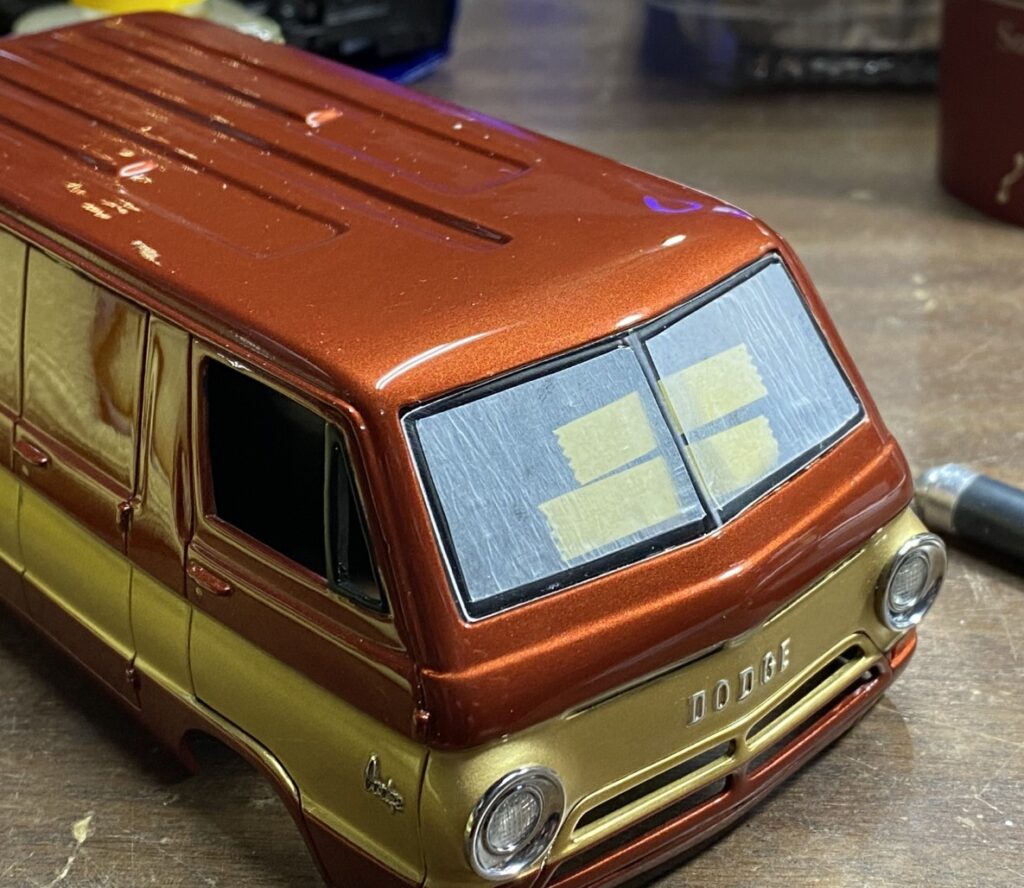
In retrospect, I should have used thinner strips for the opening and made the black edge thinner. Even so, I think the glass turned out really well. Far better than if I had tried to install glass from behind.
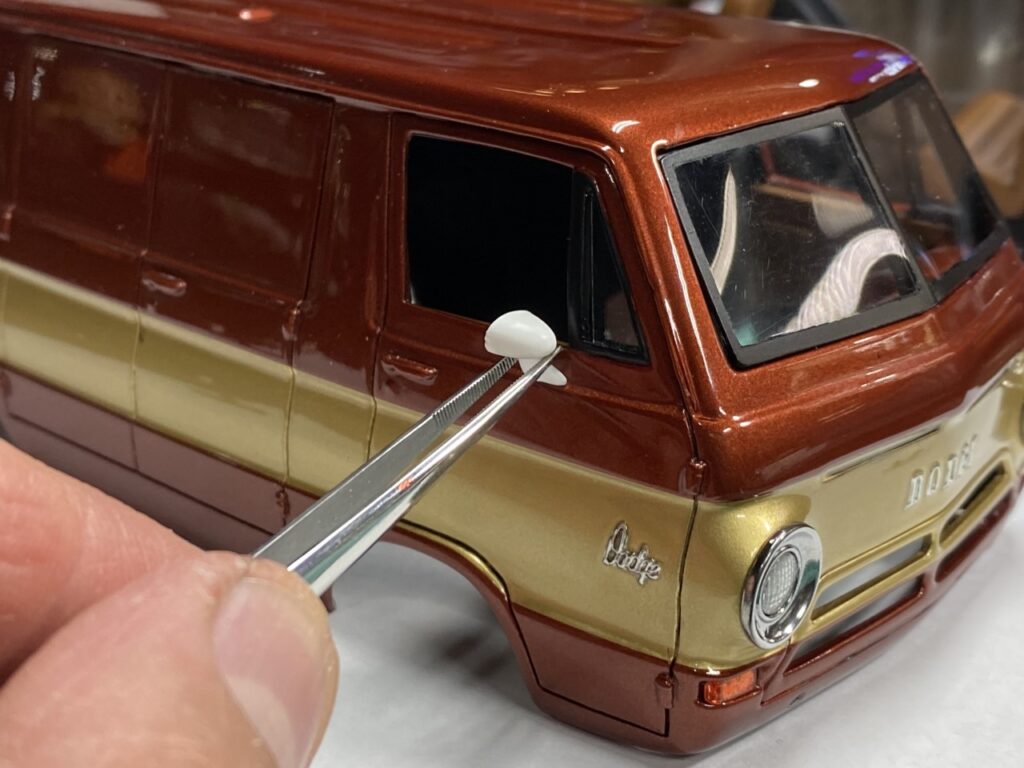
The van needed rear view mirrors. The kit mirrors weren’t that great and I didn’t have any older metal mirrors available. I did find a pair of mirrors from a ’70 GSX. After consulting with my model buddies, I decided they were perfect for the build.
Assembly
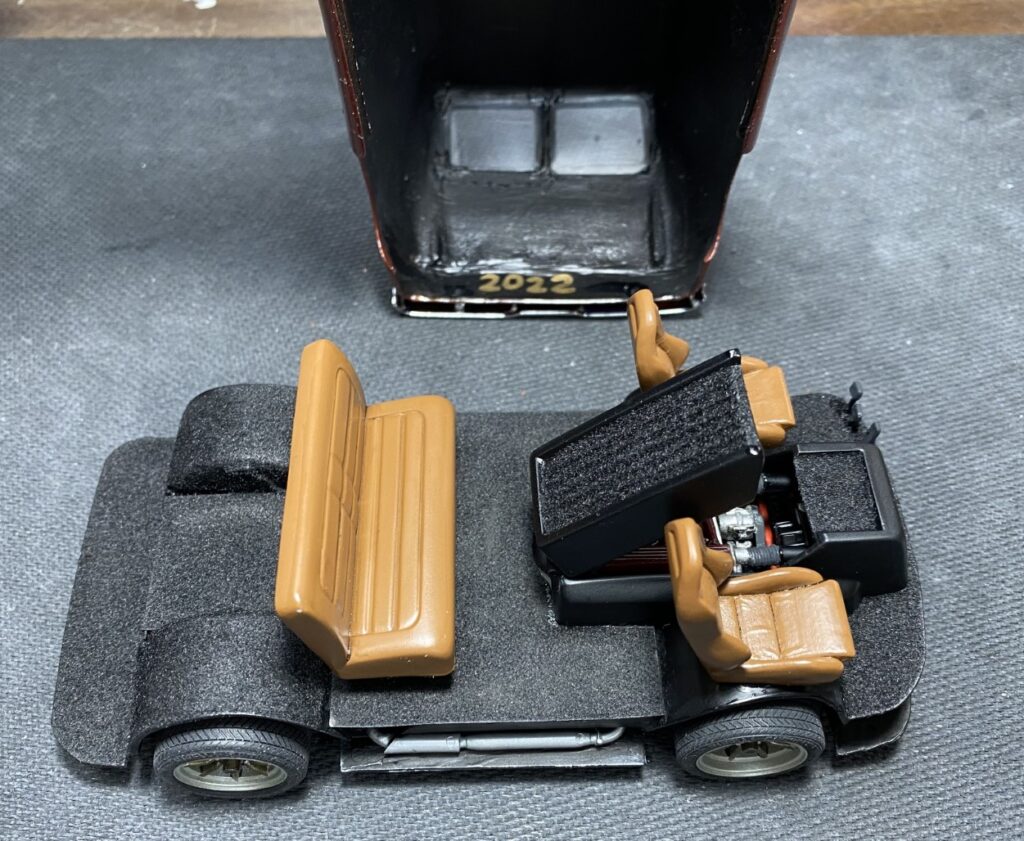
After years, and years of sitting on this project, and then a light jog through the build, it was time to pull everything together.
As I always try to do, I marked the year of the build. Next step, glue the body to the chassis.
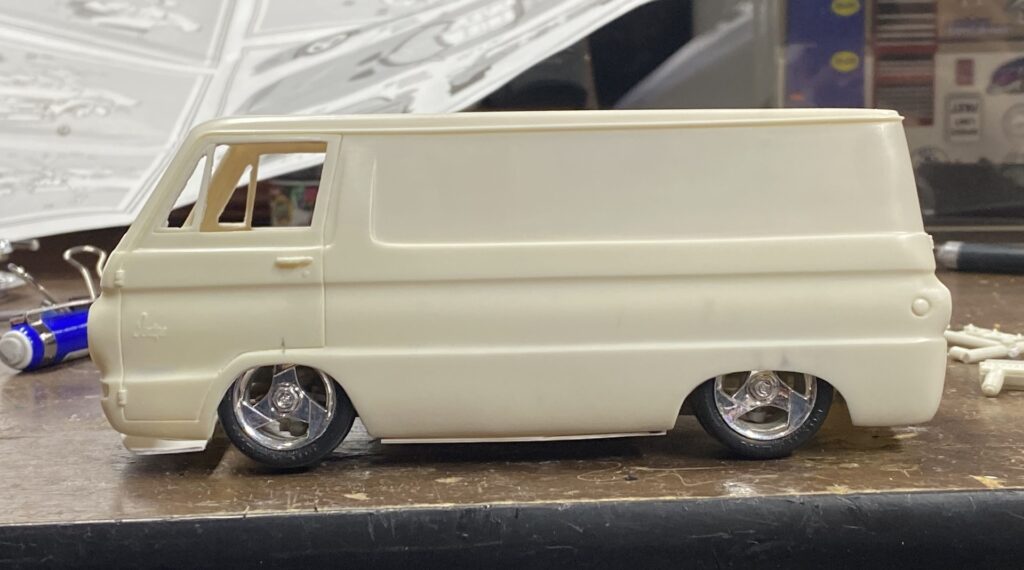
Not so fast! I really don’t know what happened through the build, but I ended up with a backwards lean. As much as I tried to convince myself it was ok, it was not ok. After pondering how I could fix the issue, I decided to chop the front spindles and glue them back in place. Problem solved with minimal effort!
Done!
Having fixed the ride height issue and gluing the body in place it was time to wrap up the final details. The door handles and locks were covered in Bare Metal Foil. I covered the gas cap with Fujimi’s metal foil. The rear view mirrors were pinned and glued in place. The last piece of the puzzle was adding the appropriate license plate!
Being able to see the engine through the windows was very important for this build.

The upgraded tires are significantly wider than the original set included with the wheels. I can say with confidence, this drives the point home that this is a serious machine!